
كاتب: دينيس Ruest, ص.Eng/IPQDF
مستوى المهارة: المتقدمة DIY (يشترط الخبرة في مجال الكهرباء)
الجهد: 120/240مرحلة الانقسام الخامس
حجم النظام: 5كيلوواط (كيلو واط)
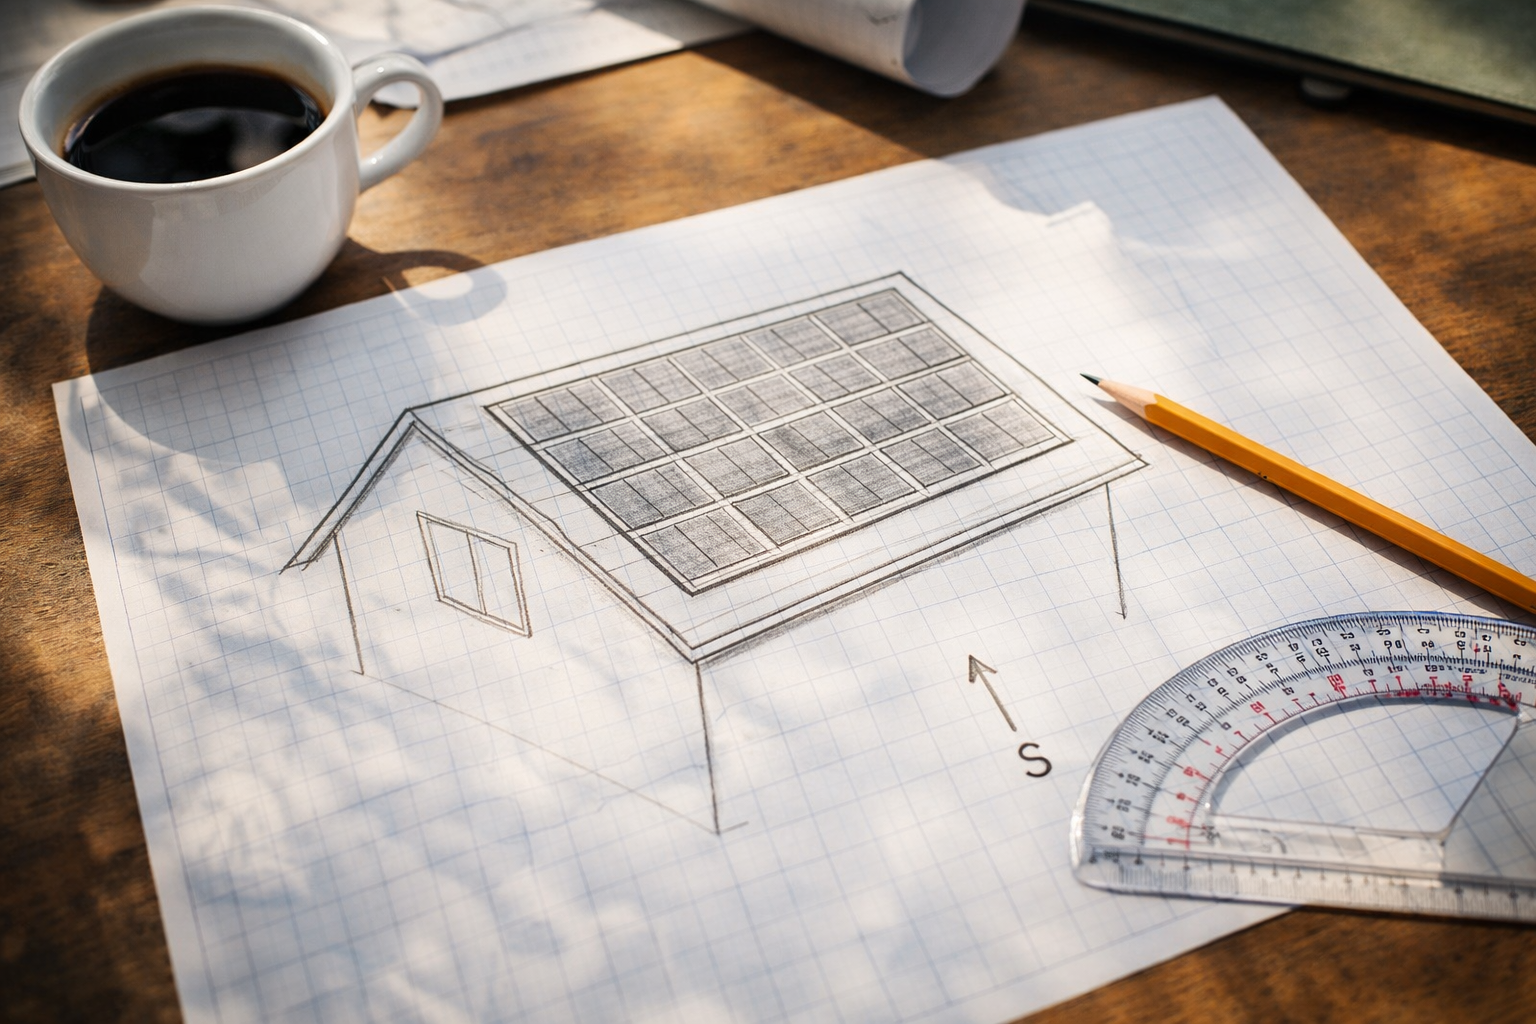
1. مقدمة: فهم هدفك
يعد النظام الشمسي بقدرة 5 كيلو وات استثمارًا كبيرًا يمكنه تشغيل معظم المنازل متوسطة الحجم. باستخدام14 لوحات (بدلا من 13) ينشئ تكوينات سلسلة متوازنة - سلسلتين متساويتين من 7 لوحات لكل منهما - تبسيط الأسلاك, تحسين التوازن الكهربائي, وجعل استكشاف الأخطاء وإصلاحها أسهل.
قبل شراء قطع الغيار, يجب عليك أن تقرر: مرتبط بالشبكة أو خارج الشبكة?
- مربوط بالشبكة: ستظل متصلاً بالأداة المساعدة. يمكنك بيع الطاقة مرة أخرى (صافي القياس) ولكن يتم إيقاف تشغيل النظام أثناء انقطاع الشبكة من أجل السلامة (مكافحة الجزر). عادةً ما ينتج النظام المرتبط بالشبكة بقدرة 5 كيلووات 20-25 كيلوواط ساعة يوميا, يكفي لتعويض متوسط الاستخدام المنزلي.
- خارج الشبكة: أنت مستقل تمامًا عن الأداة المساعدة. يتطلب بنك بطارية كبير (48V @ 200 أمبير أو أكثر). يعمل النظام 24/7 بغض النظر عن الشبكة. يمكن لنظام خارج الشبكة بقدرة 5 كيلو وات تشغيل الثلاجات, أضواء, إلكترونيات, وحتى مكيفات الهواء الصغيرة أو مضخات الآبار على دورات.
تنصل: العمل بالكهرباء أمر خطير. استشر كهربائيًا مرخصًا للتوصيلات النهائية. التصاريح مطلوبة من قبل السلطة القضائية المحلية الخاصة بك للأنظمة بهذا الحجم. هذه المقالة لأغراض إعلامية ولا تحل محل المحترف المرخص.
2. لماذا 14 لوحات? ميزة الرقم الزوجي
باستخدام 14 لوحات (سلسلتين من 7) يقدم فوائد كبيرة على 13 لوحات:
| ميزة | 13 لوحات (7+6) | 14 لوحات (7+7) |
|---|---|---|
| توازن السلسلة | سلاسل غير متساوية | متوازن تماما |
| مطابقة الجهد | الفولتية سلسلة مختلفة | الفولتية سلسلة متطابقة |
| صندوق الموحد | يتطلب الصمامات المختلفة | الصمامات متطابقة لكلا السلاسل |
| أداء | سلسلة واحدة تنتج أقل | إنتاج متساوي من كليهما |
| قابلية التوسيع | تكوين محرج | من السهل إضافة أزواج في وقت لاحق |
| إجمالي الطاقة | ~5.0 كيلو واط (مع لوحات 385 واط) | ~5.4 كيلو واط (مع لوحات 385 واط) |
مع 14 × لوحات 385 واط, تحصل عليه5,390في- مخزن مؤقت لطيف يزيد عن 5 كيلو وات يساعد في الأيام الملبدة بالغيوم دون التحميل الزائد على معظم محولات 5 كيلو وات (والتي تقبل عادةً ما يصل إلى 6000 واط من مدخلات التيار المستمر).
3. أدوات & قائمة مراجعة المواد
الأدوات المطلوبة:
- حفر & سائق تأثير مع بت عرافة
- مجموعة المقبس & الشدات (متري ومعياري)
- أدوات تعرية الأسلاك/قواطعها (10 الفريق العامل المخصص إلى 2/0 AWG قادرة)
- جهاز قياس رقمي متعدد بقدرة جهد تيار مستمر يصل إلى 600 فولت
- PV (شمسي) قفازات السلامة (معزول)
- مفتاح عزم الدوران (بوصة جنيه والقدم جنيه)
- مكتشف مسمار (إلكتروني)
- خط الطباشير
- قناة بندر (1/2″ و3/4″)
- شريط السمك
- أداة تجعيد عروات الكابلات (الهيدروليكية الموصى بها لكابلات البطارية)
مواد لنظام 5 كيلو واط (14 لوحات):
المصفوفة الشمسية:
- الألواح الشمسية: 14× لوحات 360 واط - 400 واط (إجمالي 5.0-5.6 كيلو واط). اختر ألواح أحادية البلورية عالية الكفاءة لتقليل مساحة السقف.
- نظام الأرفف: قضبان الألمنيوم, قدم L, منتصف المشابك, المشابك النهائية, وامض (ايرون ريدج, يونيراك, أو SnapNrack). تأكد من تقييم أحمال الرياح/الثلوج في منطقتك.
- هبوط: العروات التأريض, غسالات WEEB, أو الأسلاك النحاسية.
العاصمة الكهربائية:
- صندوق الموحد: حاوية مقاومة للطقس بقدرة مكونة من سلسلتين.
- سلسلة الصمامات: 15الصمامات أو القواطع لكل سلسلة (2 مطلوب, تقييمات متطابقة).
- الأسلاك الكهروضوئية: 10 الفريق العامل المخصص أو 8 AWG للتوصيلات البينية للوحات, 6 AWG للتشغيل المنزلي.
- قطع التيار المستمر: 30مفتاح أمان مصنف خارجيًا A أو 60A.
العاكس:
- خيار ربط الشبكة: 5كيلوواط سلسلة العاكس (سما, سولارايدج, فرونيوس) أو 5 كيلو واط من المحولات الدقيقة (إنفاس IQ8+). تحقق من أن الحد الأقصى لمدخل التيار المباشر يستوعب حوالي 5.4 كيلو واط.
- خيار خارج الشبكة: 5وحدة الكل في واحد مقسمة الطور كيلووات مع وحدة تحكم شحن مدمجة (جروات SPF 5000 هذا هو, إم بي بي سولار LVX6048, فيكترون MultiPlus-II). يجب أن يقبل مدخلات تيار مستمر 48 فولت.
كهرباء تكييف:
- لوحة قواطع التيار المتردد: اللوحة الرئيسية أو اللوحة الفرعية.
- قواطع ثنائية القطب: 30أ للتغذية الخلفية الشمسية.
- سلك THHN: 10 AWG النحاس (مرمزة بالألوان: أسود, أحمر, أبيض, أخضر).
- قطع التيار المتردد: مفتاح أمان مصنف للاستخدام الخارجي (إذا كان ذلك مطلوبًا عن طريق الرمز).
خارج الشبكة فقط:
- بنك البطاريات: 48V فوسفات الحديد الليثيوم (LiFePO4) بطاريات. الحد الأدنى 100 أمبير (5كيلوواط ساعة), أوصى 200Ah (10كيلوواط ساعة) للأحمال الليلية. أمثلة: EG4 ليرة لبنانية, بطارية الكأس, بيلونتيك.
- كابلات البطارية: 2/0 الفريق العامل المخصص أو 4/0 كابل لحام AWG مع العروات.
- فيوز من الفئة T: 250أ أو 300A مع حامل.
- أشرطة التوصيل: قضبان توصيل نحاسية شديدة التحمل لتوصيلات البطارية.
- رف البطارية: رف الخادم أو نظام الرف.
المواد الاستهلاكية:
- المكسرات الأسلاك / موصلات واجو
- روابط الكابلات (مقاومة للأشعة فوق البنفسجية للاستخدام في الهواء الطلق)
- قناة (جدول 40 PVC أو EMT)
- تسرب الاختراق (يسد التسقيف)
- الشريط الكهربائي
- صانع الملصقات / ملصقات مقاومة للأشعة فوق البنفسجية
4. تصميم النظام & تَخطِيط (مرحلة الأعمال الورقية)
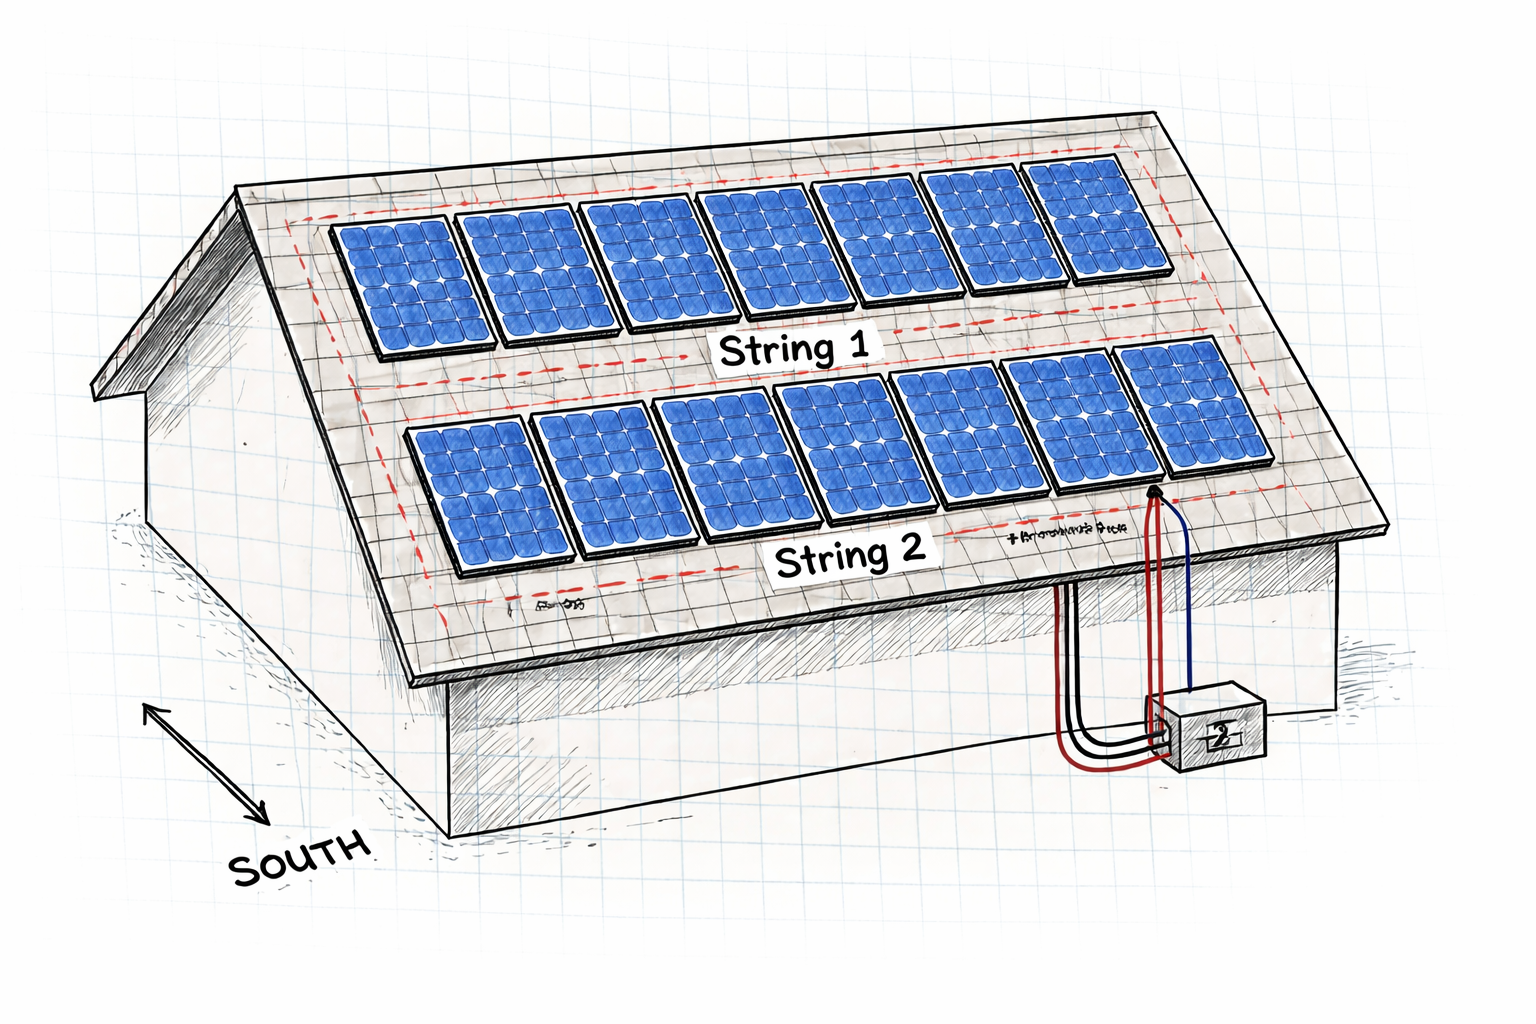
قبل رفع لوحة واحدة, يجب عليك إكمال التصميم على الورق. يعد هذا مطلوبًا للحصول على التصاريح ويضمن عمل مكوناتك معًا بأمان.
خطوة 4.1: تقييم السقف
- توجيه: المواجهة للجنوب هي الأفضل في نصف الكرة الشمالي. سوف يخسر الجنوب الشرقي أو الجنوب الغربي 10-15% إنتاج.
- يقذف: تعمل معظم الأسطح, ولكن الملاعب شديدة الانحدار (أكبر من 45 درجة) تتطلب معدات السلامة الخاصة.
- حالة: تأكد من أن السقف الخاص بك به على الأقل 10 سنوات من العمر المتبقية. إعادة التسقيف بعد تركيب الطاقة الشمسية أمر مكلف.
- العوائق: قياس المسافات من المداخن, فتحات, ومناور. تحتاج 18-36 بوصة من الخلوص حول المصفوفة للوصول إلى النار (تحقق من الرموز المحلية).
- تَخطِيط: مع 14 لوحات, يمكنك ترتيبها في صفين من 7 (اتجاه المناظر الطبيعية) أو سبعة صفوف 2 (اتجاه عمودي). صفين من 7 هو الأكثر شيوعا.
خطوة 4.2: حساب حجم السلسلة (التوازن المثالي)
مع 14 لوحات, قمت بإنشاء سلسلتين متطابقتين من 7 لوحات لكل منهما.
- جهد اللوحة: تحتوي معظم اللوحات الحديثة بقدرة 400 واط على Voc (جهد الدائرة المفتوحة) حوالي 40-45 فولت.
- السلسلة أ: 7 الألواح × 45 فولت = 315 فولت (التشغيل) / 365في (أقصى درجة حرارة باردة)
- السلسلة ب: 7 الألواح × 45 فولت = 315 فولت (التشغيل) / 365في (أقصى درجة حرارة باردة)
- إجمالي الطاقة: تتحد كلا السلسلتين بالتوازي في صندوق الدمج, إنتاج جهد متطابق وتيار متوازن.
شديد الأهمية: استخدم حاسبة حجم السلسلة (متاح على مواقع الشركات المصنعة للعاكس) مع درجة الحرارة المنخفضة القياسية لموقعك. يزيد البرد من الجهد ويمكن أن يدمر العاكس الخاص بك إذا لم يتم حسابه بشكل صحيح. مع 7 سلاسل لوحة, سيكون لديك الكثير من هامش الأمان أقل من مدخلات العاكس النموذجية 600 فولت كحد أقصى.
خطوة 4.3: تقدير الإنتاج
نظام 5.4 كيلو واط (14 × 385 واط) في منطقة بها 5 سوف تولد ساعات الذروة للشمس:
- يوميًا: 5.4كيلووات × 5 ساعات × 0.8 (خسائر النظام) =21.6 كيلوواط ساعة/يوم
- شهريا: 21.6 كيلووات ساعة × 30 =648 كيلووات ساعة/شهر
- سنويا: يختلف حسب الموسم, عادة 7,000-9,000 كيلووات ساعة/سنة
هذا يغطي 60-100% من متوسط استخدام المنزل اعتمادا على الكفاءة.
خطوة 4.4: السماح
قم بزيارة قسم البناء المحلي الخاص بك مع:
- مخطط الموقع يوضح أبعاد السقف
- مخطط تخطيط اللوحة (14 لوحات تظهر بوضوح)
- مخطط كهربائي ذو سطر واحد
- أوراق مواصفات المعدات
- الحسابات الهيكلية (إذا لزم الأمر)
انتظر الموافقة قبل شراء المعدات أو البدء في التثبيت.
5. قم بتثبيت الأرفف (تركيب الأجهزة)
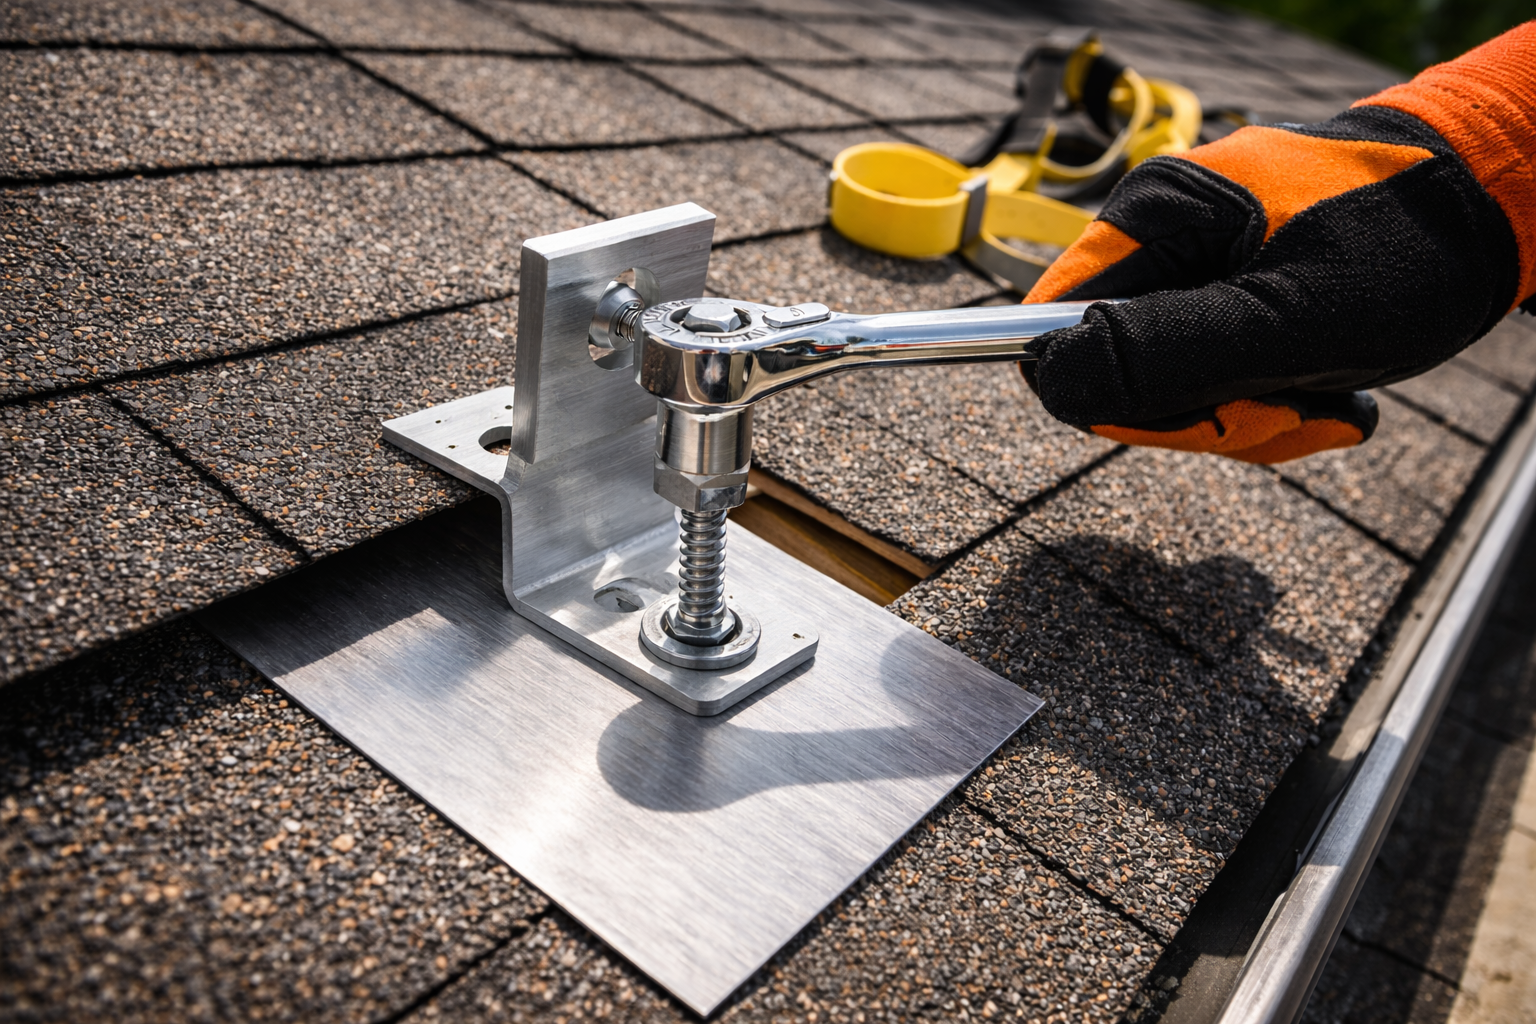
نظام الأرفف هو أساس مجموعة الطاقة الشمسية الخاصة بك. نظام 5 كيلو واط مع 14 تزن الألواح تقريبًا 650-850 جنيه ويجب أن تتحمل قوى رفع الرياح.
خطوة 5.1: تحديد موقع العوارض الخشبية
- استخدم أداة البحث عن المسامير الإلكترونية لتحديد موقع العوارض الخشبية. قم بتمييزها بخطوط الطباشير عبر منطقة السطح.
- التباعد القياسي بين العوارض الخشبية هو 24″ على المركز. إذا كانت المسافة بينكما أوسع, أنت بحاجة إلى تعزيز هيكلي.
- قم بتمييز جميع مواقع العوارض الخشبية بوضوح - ستحتاج إلى ذلك لكل نقطة تثبيت.
- إلى 14 لوحات في صفين, ستحتاج إلى نقاط تثبيت عند كل تقاطع عارض مع القضبان.
خطوة 5.2: تثبيت وامض
- ارفع القوباء المنطقية بعناية حيث سيوضع التركيب. استخدم شريطًا مسطحًا لتجنب تشقق القوباء المنطقية.
- حرك وميض الألمنيوم بالكامل تحت الألواح الخشبية, مع الحافة العلوية تحت الدورة أعلاه.
- يجب أن يحتوي اللمعان على مادة مانعة للتسرب مدمجة أو يجب عليك وضع مادة تسقيف تحته.
خطوة 5.3: نعلق قدم L
- حفر حفرة تجريبية من خلال وامض وفي المركز الخشبي. استخدم نقطة توقف على لقمة الحفر الخاصة بك لمنع الحفر العميق.
- أدخل الترباس المتأخر (عادة 3/8″ × 4″ الفولاذ المقاوم للصدأ) مع غسالة مدمجة.
- أحكم ربطه بقوة ولكن لا تفرط في عزم الدوران. الهدف هو ضغط الوميض دون تشويهه.
- قم بإغلاق رأس الترباس باستخدام مادة تسقيف إضافية.
خطوة 5.4: تثبيت القضبان
- قم بتوصيل قضبان متقاطعة من الألومنيوم بالأقدام على شكل حرف L باستخدام مسامير وأغطية على شكل حرف T.
- إلى 14 لوحات في صفين من 7, ستحتاج إلى قضبان أفقية تعمل بالعرض الكامل للمصفوفة.
- تأكد من أن القضبان مستوية تمامًا من الجانب إلى الجانب ومن الأمام إلى الخلف. استخدم مستوى 4 أقدام.
- انضم إلى أقسام السكك الحديدية باستخدام التوصيلات الداخلية إذا كان مسارك أطول من أطوال السكك الحديدية المتاحة. تأكد من أن التوصيلات ضيقة ومستقيمة.
نصيحة السلامة: ارتداء حزام مع مرساة السقف في جميع الأوقات. السقوط من السطح يمكن أن يكون قاتلاً.
6. تركيب الألواح الشمسية
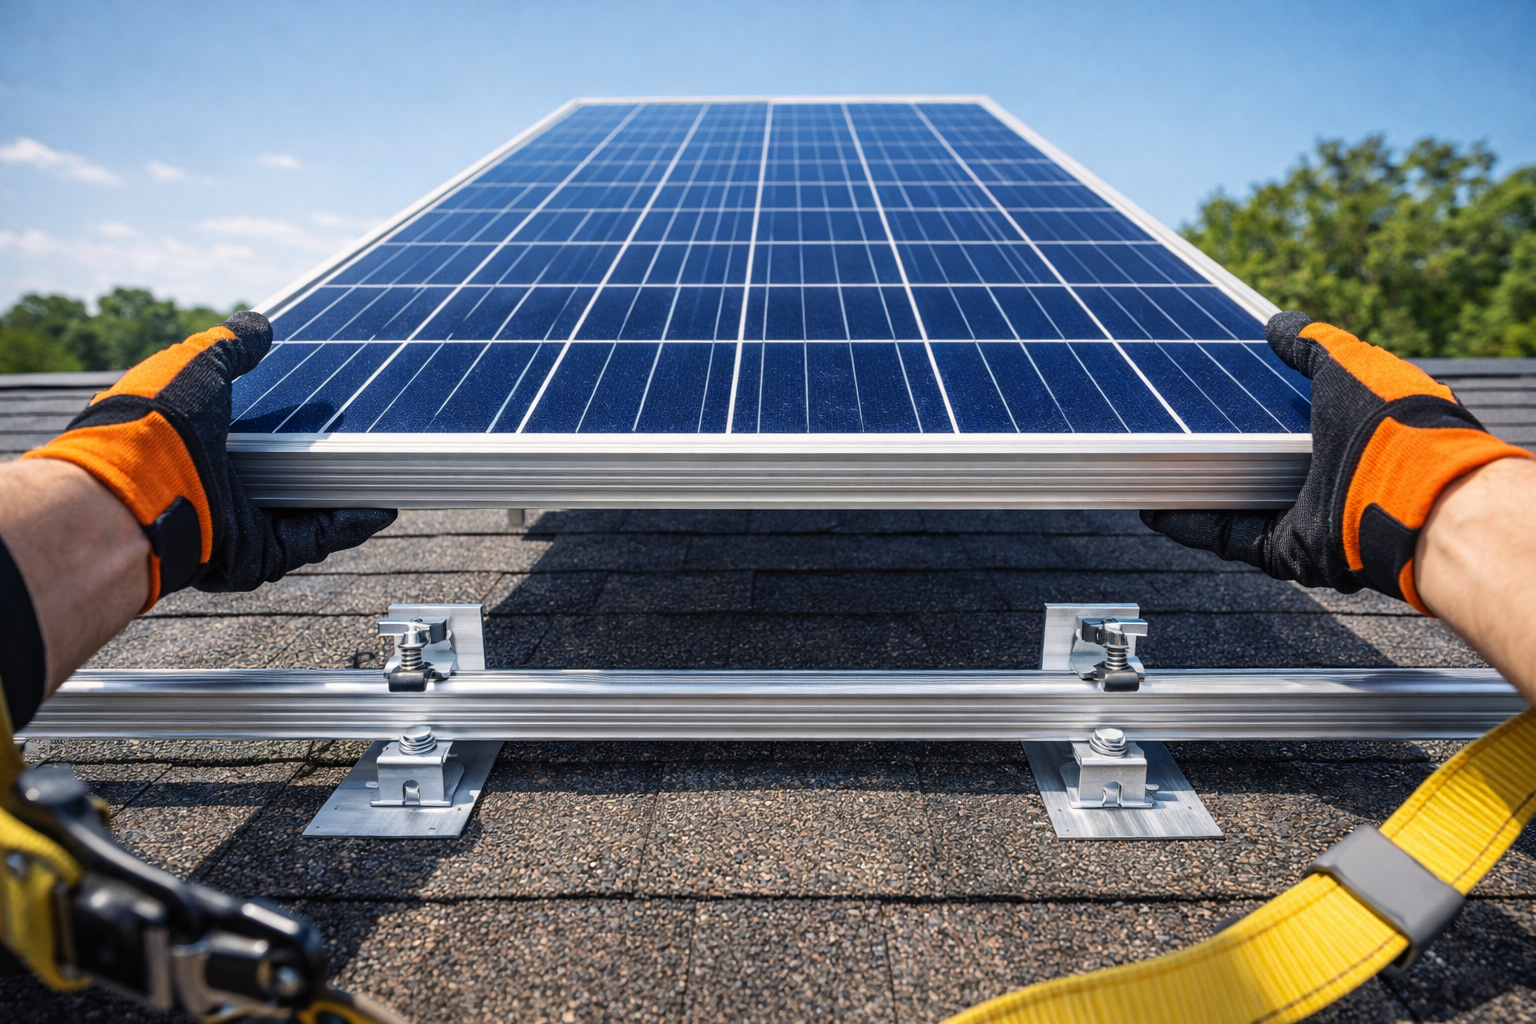
خطوة 6.1: لوحات المرحلة بأمان
- ارفع الألواح على السطح باستخدام رافعات الألواح, خطافات السقف, أو تسليمها بعناية.
- مع 14 لوحات, العمل بشكل منهجي — لوحات مسرحية لصف واحد في كل مرة.
- ضع الألواح مقلوبة على وسادات رغوية لحماية الزجاج أثناء تحضير الأسلاك.
خطوة 6.2: ما قبل الأسلاك (اختياري ولكن موصى به)
- إذا كان الوصول إليها, قم بتوصيل كابلات تمديد MC4 بصناديق توصيل اللوحة قبل التركيب.
- يعد هذا أسهل على الأرض أو مع الألواح المقلوبة مقارنةً بتركيبها.
- إلى 14 لوحات, سيكون لديك 14 إيجابية و 14 يؤدي إلى التنظيم بشكل سلبي.
خطوة 6.3: لوحات الموقف
- ابدأ من إحدى زوايا المصفوفة. ضع اللوحة الأولى على القضبان.
- العمل عبر الصف, ثم ابدأ الصف الثاني.
- يجب أن توضع الألواح على القضبان مع وضع الإطار على المشابك.
خطوة 6.4: تأمين مع المشابك
- منتصف المشابك: تستخدم بين الألواح. يقومون بتثبيت إطارات لوحتين متجاورتين على السكة. سوف تحتاج تقريبا 22 منتصف المشابك.
- نهاية المشابك: تستخدم في نهايات كل سكة لتأمين اللوحة الأخيرة. سوف تحتاج 4 المشابك النهائية لكل سكة (8 المجموع).
- عزم دوران جميع المشابك وفقًا لمواصفات الشركة المصنعة (عادة 15-20 قدم رطل). يؤدي عدم القدرة على عزم الدوران إلى خطر انفجار اللوحات; الإفراط في عزم الدوران يمكن أن يؤدي إلى كسر الإطارات.
خطوة 6.5: قم بتأريض المصفوفة
- استخدم ويب (غسالة المعدات الكهربائية السندات) مقاطع تخترق الطلاء المؤكسد على القضبان وإطارات الألواح.
- بدلاً عن ذلك, قم بتشغيل سلك أرضي نحاسي مكشوف متصل بكل سكة باستخدام عروات التأريض المدرجة.
- قم بتوصيل أرض الصفيف بنظام قطب التأريض بالمنزل.
7. التمديدات الكهربائية (جانب العاصمة)
[صورة: لقطة مقربة لموصلات MC4 تنقر معًا, ثم يظهر الرسم التخطيطي 2 سلاسل متطابقة 7 دمج اللوحات في صندوق موحد]
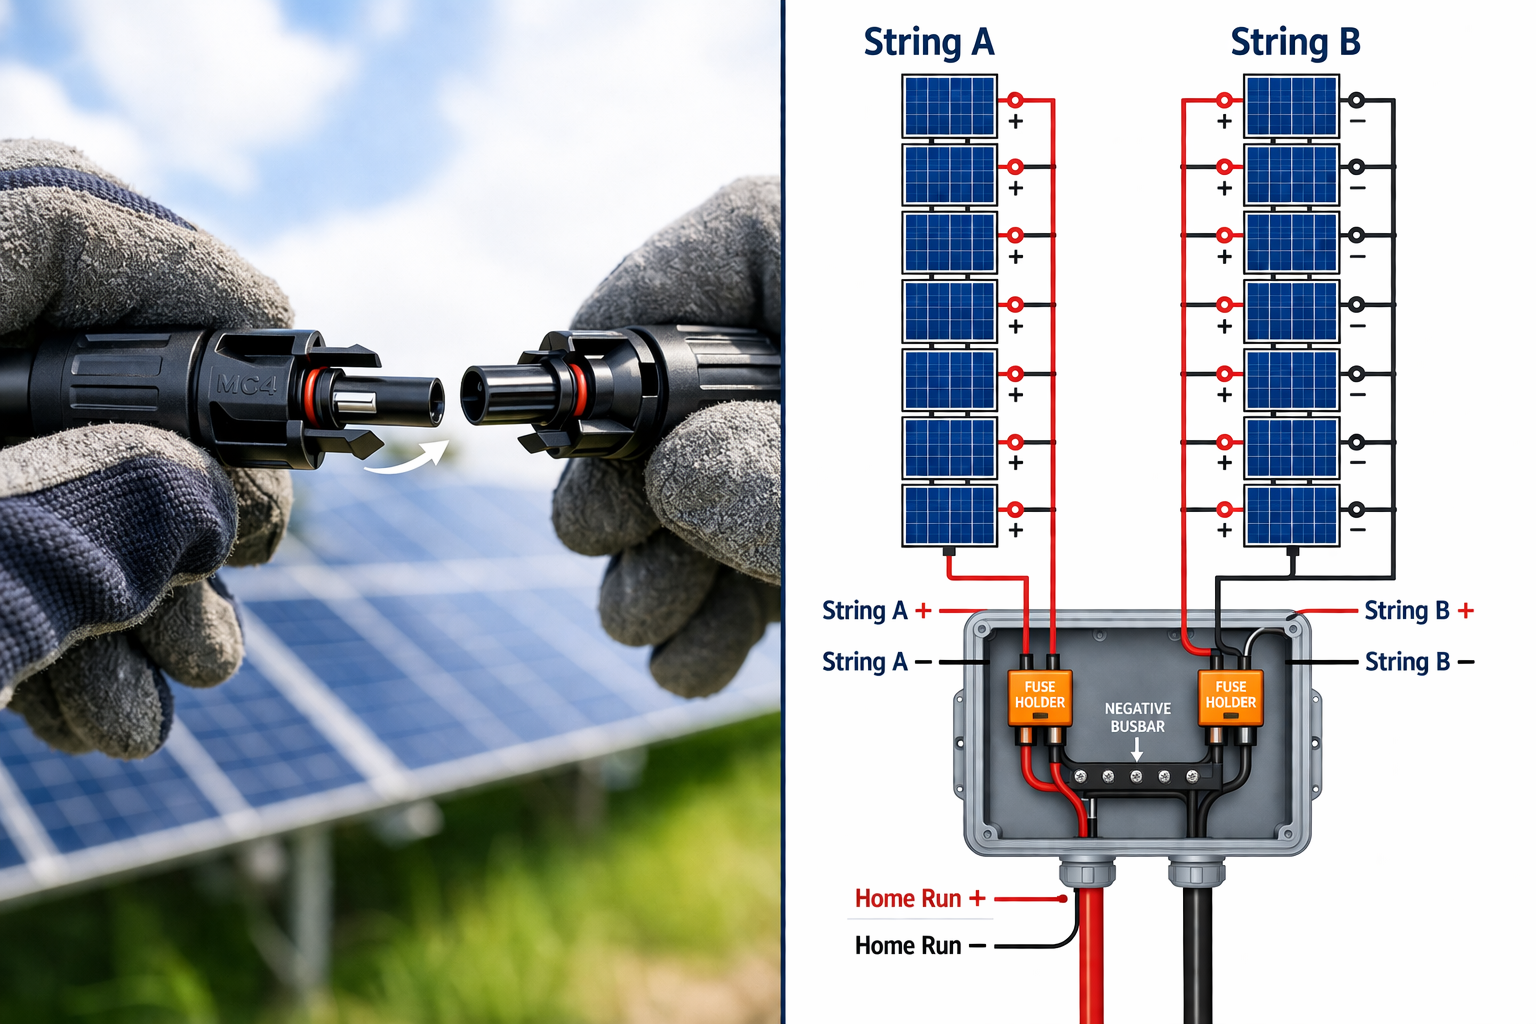
مع 14 لوحات, يمكنك إنشاء سلسلتين متطابقتين تمامًا من 7 لوحات لكل منهما.
خطوة 7.1: تكوين السلاسل
- السلسلة أ (7 لوحات): ربط إيجابي (+) من لوحة 1 إلى سلبية (-) من لوحة 2, وهكذا من خلال جميع 7 لوحات. سيكون للنهاية إيجابي واحد مجاني وواحد سلبي مجاني.
- السلسلة ب (7 لوحات): كرر العملية للباقي 7 لوحات, باتباع نفس النمط.
خطوة 7.2: فحص الجهد
- قبل الاتصال بالعاكس, قم بقياس جهد كل سلسلة بمقياس متعدد في يوم مشمس.
- يجب أن تقرأ السلسلة A تقريبًا 280-320 فولت تيار مستمر (اعتمادًا على مواصفات اللوحة وأشعة الشمس).
- ينبغي قراءة السلسلة Bنفس الجهد إلى السلسلة أ (في حدود 1-2 فولت).
- سجل هذه القيم لسجلاتك. تؤكد الفولتية المتطابقة الأسلاك المناسبة.
خطوة 7.3: قم بتشغيل الأسلاك إلى صندوق الموحد
- قم بتشغيل الأسلاك الموجبة والسالبة من كل سلسلة وصولاً إلى موقع صندوق الموحد (عادة بالقرب من حافة المصفوفة أو على الحائط أدناه).
- استخدم سلكًا كهروضوئيًا مُصنفًا للتعرض الخارجي وأشعة الشمس.
- قم بتسمية كل زوج من الأسلاك بشكل واضح: “السلسلة أ +”, “السلسلة أ -“, “السلسلة ب +”, “السلسلة ب -“.
خطوة 7.4: تثبيت صندوق الموحد
- قم بتركيب صندوق الدمج المقاوم للعوامل الجوية على الحائط بالقرب من المصفوفة أو على حافة السقف.
- داخل الصندوق, ربط كل سلسلة إيجابية ل15الصمامات أو الكسارة (متطابقة لكلا السلاسل).
- قم بتوصيل كل سلسلة سلبية بشريط توصيل سلبي مشترك.
- يذهب الإخراج المشترك إلى سلك واحد إيجابي وسالب (ال “تشغيل المنزل”).
خطوة 7.5: قم بتشغيل Home Run to DC Disconnect
- من صندوق الموحد, يجري6 الفريق العامل المخصص الأسلاك الكهروضوئية (الإيجابية والسلبية) وصولاً إلى مفتاح فصل التيار المستمر المثبت بالخارج بالقرب من العاكس.
- استخدم القناة للحماية في الأماكن التي تتعرض فيها الأسلاك.
- قم بتسمية هذا السلك “خرج المصفوفة الكهروضوئية 5.4 كيلو واط” في كلا الطرفين.
8. جبل العاكس & لوحة التيار المتردد
خطوة 8.1: حدد الموقع
- في الداخل (المرآب / الطابق السفلي) مثالية لطول عمر العاكس.
- تتطلب الأماكن الخارجية عاكسًا مصنفًا NEMA 4X.
- يجب أن يكون الموقع قريبًا من اللوحة الكهربائية الرئيسية لتقليل تشغيل أسلاك التيار المتردد.
- ل خارج الشبكة, يجب أن يكون الموقع قريبًا من بنك البطارية (يجب أن تكون كابلات البطارية قصيرة).
خطوة 8.2: تثبيت اللوحة الخلفية
- جبل 4′ × 4′ ورقة 3/4″ الخشب الرقائقي على الحائط. قم بطلائها بطلاء مقاوم للحريق إذا كان ذلك مطلوبًا بموجب الكود.
- وهذا يوفر سطحًا صلبًا للتثبيت وينظم المعدات.
خطوة 8.3: جبل العاكس
- وزن العاكس: 5وحدات كيلوواط تزن 50-100 جنيه. استخدم مسامير التأخر في الأزرار.
- الحفاظ على التخليص المحدد من قبل الشركة المصنعة (عادة 6-12 بوصة من جميع الجوانب) لتدفق الهواء.
- تأكد من أن العاكس هو المستوى.
خطوة 8.4: لوحة جبل التيار المتردد
- في حالة استخدام لوحة فرعية للأحمال الحرجة (خارج الشبكة), تركيبه بجانب العاكس.
- إذا التغذية الخلفية للوحة الرئيسية (مربوط بالشبكة), تأكد من أن اللوحة الرئيسية تحتوي على فتحة قاطعة مزدوجة القطب.
خطوة 8.5: تثبيت قطع الاتصال
- قم بتركيب قطع التيار المستمر (بين صندوق الموحد والعاكس) على مرأى من العاكس.
- قم بتركيب قطع التيار المتردد (بين العاكس واللوحة الرئيسية) إذا كان ذلك مطلوبًا بواسطة الكود المحلي.
9. أسلاك بنك البطارية (خارج الشبكة فقط)
يسحب عاكس بقدرة 5 كيلو وات عند 48 فولت104 الامبير في حمولة كاملة. وهذا يتطلب حماية جدية للكابلات والسلامة.
خطوة 9.1: حدد تكوين البطارية
- 48نظام V: تتطلب معظم محولات الطاقة خارج الشبكة بقدرة 5 كيلو وات بنك بطارية بقوة 48 فولت.
- سعة: لتشغيل حمولة 5 كيلو واط طوال الليل (يقول 10 ساعات في التحميل الجزئي), تحتاج إلى ما لا يقل عن 10 كيلو واط ساعة من التخزين.
- الإعداد النموذجي مع 14 لوحات: بقدرة 5.4 كيلو واط من الطاقة الشمسية, يمكنك شحن بنك بطارية كبير. مُستَحسَن: 48في @ 200Ah (10كيلوواط ساعة) الحد الأدنى, 48الخامس @ 300 أمبير (15كيلوواط ساعة) مثالي.
- خيارات التكوين:
- 4× بطاريات 12 فولت 200 أمبير في السلسلة = 48 فولت @ 200 أمبير (10كيلوواط ساعة)
- 8× 12 فولت 200 أمبير على التوالي = 48 فولت @ 400 أمبير (20كيلوواط ساعة)
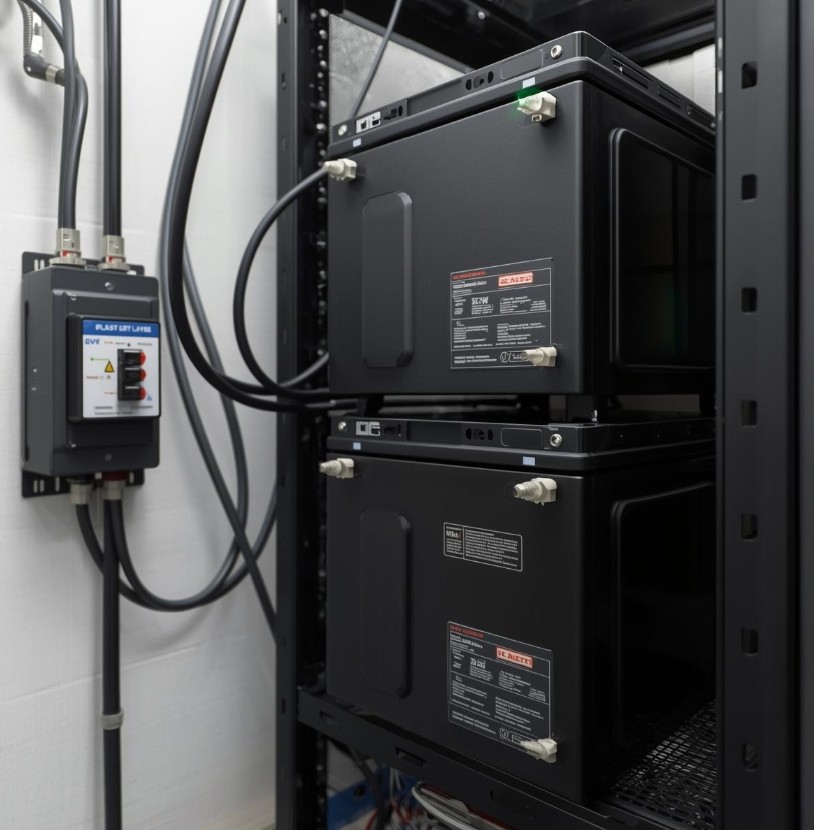
- 3× بطاريات رف الخادم 48 فولت على التوازي = 48 فولت @ 300 أمبير (15كيلوواط ساعة)
خطوة 9.2: موقف البطاريات
- ضع البطاريات على الرف أو الرف. لا تضعه مباشرة على أرضية خرسانية (البرد يمكن أن يضر بهم).
- تأكد من وجود تهوية كافية، حيث يمكن أن تنطلق الغازات من البطاريات (حتى الليثيوم في ظروف الخطأ) وتوليد الحرارة.
خطوة 9.3: بطاريات سلكية
- يستخدم2/0 الفريق العامل المخصص أو4/0 الفريق العامل المخصص كابل لحام لجميع توصيلات البطارية.
- قم بتجعيد العروات الثقيلة على الكابلات باستخدام المكشكش الهيدروليكي.
- لاتصالات السلسلة: توصيل إيجابي للبطارية 1 إلى سلبية البطارية 2, الخ.
- للسلاسل المتوازية: قم بتوصيل جميع الإيجابيات معًا على شريط التوصيل, كل السلبيات معا على بسبار.
خطوة 9.4: قم بتثبيت منصهر Class-T
- شديد الأهمية: قم بتركيب منصهر Class-T بالداخل 12 بوصة من الطرف الموجب للبطارية.
- تحجيم الصمامات: العاكس ماكس الحالي المستمر x 1.25 = حجم الصمامات. ل 104A س 1.25 = 130 ألف كحد أدنى. تستخدم معظم محولات 5 كيلو وات صمامات 200A-250A للتعامل مع الأحمال الزائدة.
- يحمي منصهر Class-T من الدوائر القصيرة، حيث يمكن للبطاريات توصيل آلاف الأمبيرات في حالة حدوث خطأ, تسبب حريق أو انفجار.
خطوة 9.5: الاتصال بالعاكس
- قم بتشغيل الكابل الموجب من المصهر إلى الطرف الموجب لبطارية العاكس.
- قم بتشغيل الكابل السالب مباشرة من شريط التوصيل السالب للبطارية إلى الطرف السالب لبطارية العاكس.
- عزم الدوران جميع الاتصالات لمواصفات الشركة المصنعة.
خطوة 9.6: تثبيت مراقب البطارية (اختياري)
- قم بتثبيت جهاز مراقبة البطارية القائم على التحويلة (فيكترون BMV-712 أو ما شابه ذلك) لتتبع حالة الشحن بدقة.
- يعد هذا أمرًا ضروريًا للحياة خارج الشبكة لمعرفة مقدار السعة المتبقية.
10. أسلاك التيار المتردد (مربوط بالشبكة & خارج الشبكة)
[صورة: كهربائي يقوم بتوصيل قاطع ثنائي القطب بقوة 30 أمبير في لوحة كهربائية رئيسية, المسمى “شمسي”]
خطوة 10.1: فهم الرياضيات
5,400 واتس في 240 فولت =22.5 الامبير مستمر (بكامل خرجه 5.4 كيلو واط).
يتطلب قانون الكهرباء الوطني تحديد حجم الدوائر 125% من الحمل المستمر:
- 22.5أ س 1.25 =28.1A
- لذلك, أنت بحاجة إلى30قاطع ثنائي القطب (الحجم القياسي التالي فوق 28.1A).
خطوة 10.2: اختيار مقياس الأسلاك
- لقاطع 30A, استخدام10 الأسلاك النحاسية AWG (الحد الأدنى).
- إذا تجاوز التشغيل من العاكس إلى اللوحة الرئيسية 100 قدم, الترقية إلى8 الفريق العامل المخصص لمنع انخفاض الجهد.
- استخدم سلك THHN المرمز بالألوان: أسود (L1), أحمر (L2), أبيض (حيادي), أخضر (أرض).
خطوة 10.3: اتصال خارج الشبكة
- تشغيل L1, L2, حيادي, والأرض من مخرج العاكس إلى مخرج مخصص “الأحمال الحرجة” لوحة فرعية.
- في اللوحة الفرعية, قم بتركيب قواطع قياسية 15 أمبير و20 أمبير للدوائر التي تريد عمل نسخة احتياطية لها (ثلاجة, أضواء, الإنترنت, إلخ).
- انقل تلك الدوائر من اللوحة الرئيسية إلى اللوحة الفرعية.
خطوة 10.4: اتصال مرتبط بالشبكة (التغذية الخلفية)
- تشغيل L1, L2, حيادي, والأرض من مخرج العاكس إلى لوحة الخدمة الرئيسية.
- قم بتركيب الكسارة ثنائية القطب 30 أمبير في فتحة مفتوحة في الطرف المقابل للوحة من الكسارة الرئيسية (هذا يساعد في 120% قاعدة).
- قم بتوصيل L1 بأحد أطراف القاطع, L2 إلى المحطة الأخرى. قم بتوصيل الحياد بشريط التوصيل المحايد, الأرض إلى الأرض بسبار.
- تسمية الكسارة “الطاقة الشمسية 5.4 كيلو واط” من الواضح أن كهربائيين المستقبل يعرفون أنه ذو تغذية عكسية.
خطوة 10.5: و 120% قاعدة (أمر بالغ الأهمية للربط بالشبكة)
- شريط باص اللوحة الرئيسية الخاص بك لديه تصنيف (عادة 100A, 125A, أو 200A).
- لا يمكن أن يتجاوز مجموع الكسارة الرئيسية وقاطع التغذية العكسية الشمسية 120% من تصنيف بسبار.
- مثال: 125بسبار x 1.2 = 150 أمبير كحد أقصى. 100رئيسي + 30الطاقة الشمسية = 130 أمبير, وهو مقبول.
- إذا كانت اللوحة الخاصة بك لا تستطيع استيعاب هذا, أنت بحاجة إلى “العرض الجانبي الحنفية” (الاتصال قبل الكسارة الرئيسية), الذي يتطلب كهربائي.
11. الاتصالات النهائية & تسلسل التشغيل
[صورة: يقوم شخص يستخدم مقياسًا متعددًا لفحص الجهد عند التيار المستمر بفصله قبل تشغيله]
خطوة 11.1: فحوصات ما قبل الطاقة
- التفتيش البصري: تحقق من كل اتصال سلكي. ابحث عن خيوط فضفاضة, العزل الملقط, أو توجيه غير صحيح.
- فحص القطبية: التحقق من الإيجابية يذهب إلى الإيجابية, سلبي إلى سلبي في كل مكان. القطبية المعكوسة على وحدة التحكم بالشحن أو العاكس سوف تدمرها على الفور.
- فحص عزم الدوران: تأكد من عزم جميع البراغي الطرفية وفقًا للمواصفات. التوصيلات السائبة تسبب الانحناء والحرائق.
- فحص الجهد (DC): قياس الجهد عند قطع التيار المستمر. يجب أن تظهر كلا السلسلتين جهدًا متطابقًا (ضمن 2V).
- فحص الجهد (AC): تأكد من تنشيط اللوحة الرئيسية وأن الجهد الكهربي 120/240 فولت ±5%.
خطوة 11.2: تسلسل التشغيل (مربوط بالشبكة)
- قم بتشغيل قاطع التيار المتردد من اللوحة الرئيسية إلى العاكس (قوة الشبكة).
- انتظر حتى يتم تشغيل شاشة العاكس وإظهار معلمات الشبكة.
- قم بتشغيل قطع التيار المستمر من المجموعة الشمسية.
- يجب أن يكتشف العاكس الطاقة الشمسية, تزامن مع الشبكة (يأخذ 2-5 دقيقة), والبدء في التصدير.
- التحقق من العروض المعروضة “إنتاج” أو “مربوط بالشبكة” وضع مع القوة الكهربائية الإيجابية. مع 14 لوحات, يجب أن ترى 4.5-5.4 كيلو واط بالقرب من الظهيرة الشمسية.
خطوة 11.3: تسلسل التشغيل (خارج الشبكة)
- تأكد من إيقاف تشغيل جميع أحمال التيار المتردد.
- قم بتشغيل قاطع بطارية التيار المستمر أو افصله أولاً.
- يجب أن تضيء شاشة العاكس. تحقق من قراءة جهد البطارية بشكل صحيح.
- قم بتشغيل فصل الطاقة الشمسية DC.
- يجب أن يتم تنشيط وحدة التحكم بالشحن والبدء في شحن البطاريات (الوضع السائب). يجب أن يرتفع الجهد.
- قم بتشغيل قاطع إخراج التيار المتردد العاكس.
- اختبار عن طريق تشغيل حمولة صغيرة (مثل الضوء). يجب على العاكس تشغيله.
- قم بإضافة أحمال أكبر تدريجيًا لاختبار استجابة النظام.
خطوة 11.4: مراقبة العملية الأولية
- دع النظام يعمل من أجل 30 دقيقة. انتبه ل:
- أصوات غير عادية (الأز, الانحناء)
- ارتفاع درجة حرارة المكونات
- رموز الخطأ على الشاشة
- مراوح العاكس تدور بشكل صحيح
- مع سلاسل متوازنة, يجب أن يساهم كلاهما بالتساوي — تحقق من عرض العاكس للبيانات لكل سلسلة إذا كانت متوفرة.
12. رصد & اختبار الأداء
[صورة: لقطة شاشة لهاتف ذكي تُظهر تطبيقًا لمراقبة الطاقة الشمسية بإنتاج 5.4 كيلووات و 26.5 كيلوواط ساعة المجموع اليومي]
خطوة 12.1: مراقبة الاتصال
- تحتوي معظم المحولات الحديثة على اتصال Wi-Fi أو Ethernet.
- قم بتنزيل تطبيق الشركة المصنعة وقم بإنشاء حساب.
- قم بتسجيل العاكس باستخدام رقمه التسلسلي.
- اتصل بشبكتك المنزلية وتحقق من نقل البيانات.
خطوة 12.2: التحقق من الإنتاج
- في يوم صافٍ بالقرب من الظهيرة الشمسية, يجب أن ينتج نظامك بقدرة 5.4 كيلو واط4.6كيلوواط – 5.2كيلوواط .اعتمادا علي:
- درجة حرارة اللوحة (تنتج الألواح الساخنة أقل)
- الزاوية بالنسبة للشمس
- الظروف الجوية
- إذا كان الإنتاج أقل بكثير, تحقق من وجود مشاكل التظليل أو مشاكل الأسلاك.
- قارن بين السلسلتين — يجب أن تظهرا مخرجات متطابقة تقريبًا.
خطوة 12.3: التوقعات اليومية / السنوية
- يوميًا: 22-32 كيلووات ساعة حسب الموسم
- شهريا: 660-960 كيلوواط ساعة
- سنوي: 8,000-11,000 كيلوواط ساعة (يختلف حسب الموقع)
خطوة 12.4: مراقبة محددة خارج الشبكة
- تتبع حالة شحن البطارية يوميًا.
- لاحظ الوقت الذي تصل فيه البطاريات إلى الشحن الكامل (يشير إلى كفاية حجم الصفيف).
- لاحظ الوقت الذي تصل فيه البطاريات إلى مستوى الشحن المنخفض (يشير إلى ما إذا كانت هناك حاجة لمزيد من السعة).
- اضبط عادات الاستخدام إذا لزم الأمر لتمتد طوال الليل.
13. وضع العلامات & توثيق
[صورة: لوحة كهربائية نظيفة مع ملصقات مطبوعة بشكل احترافي على كل قاطع وسلك]
يتطلب الرمز وضع علامات محددة للسلامة:
التسميات المطلوبة:
- قطع التيار المستمر: “قطع اتصال النظام الكهروضوئي – 5.4كيلوواط العاصمة”
- قطع التيار المتردد: “قطع التيار المتردد الشمسي – 5.4كيلوواط”
- قواطع متخلفة: “الطاقة الشمسية 5.4 كيلو واط” (على الكسارة نفسها)
- اللوحة الرئيسية: علامة تحذير تفيد “يتم توفير هذه المعدات من مصادر متعددة – الطاقة الشمسية 5.4 كيلو واط” (إذا التغذية الخلفية)
- العاكس: علامة الشركة المصنعة مع التقييمات مرئية
- صندوق الموحد: “السلسلة أ (7 لوحات)” و “السلسلة ب (7 لوحات)” على كل الصمامات
- جميع الموصلات: تحديد عند كل نقطة انتهاء مع الجهد والمصدر
الوثائق التي يجب الاحتفاظ بها:
- وثائق الموافقة على التصريح
- كتيبات المعدات
- مخطط من سطر واحد مع ملاحظة أطوال الأسلاك الفعلية
- معلومات الضمان
- مراقبة بيانات اعتماد تسجيل الدخول
- إجراءات الاغلاق في حالات الطوارئ (آخر بالقرب من اللوحة الرئيسية)
- رسم تخطيطي للوحة يوضح اللوحات التي تنتمي إلى أي سلسلة
14. الأخطاء الشائعة التي يجب تجنبها
خطأ #1: سلك صغير الحجم
- نظام 5.4 كيلو واط يسحب تيارًا خطيرًا. باستخدام 14 يؤدي سلك AWG لتوصيلات البطارية أو التشغيل الطويل للتيار المستمر إلى انخفاض الجهد وخطر الحريق.
- حل: استخدم دائمًا الآلات الحاسبة لانخفاض الجهد واتبع جداول سعة NEC. مع 14 لوحات, تيار تشغيل منزلك أعلى - الاستخدام 6 الحد الأدنى لـ AWG.
خطأ #2: تجاهل تأثيرات درجة الحرارة على الجهد
- تزيد درجات الحرارة الباردة من جهد اللوحة. يمكن للألواح المقدرة بـ 40 فولت عند 25 درجة مئوية أن تصل إلى 48 فولت عند -10 درجة مئوية.
- حل: احسب جهد السلسلة باستخدام درجة الحرارة المنخفضة القياسية لمنطقتك. مع 7 سلاسل لوحة, لديك هامش أمان جيد.
خطأ #3: خلط أنواع اللوحات في السلاسل
- يجب أن يكون للوحات المتصلة على التوالي نفس التيار. يجب أن يكون للألواح الموازية نفس الجهد.
- حل: قم بشراء لوحات متطابقة لمجموعة كاملة مكونة من 14 لوحة. لا تخلط بين القديم والجديد.
خطأ #4: تخطي فيوز البطارية (خارج الشبكة)
- يمكن للبطاريات توصيل آلاف الأمبيرات في دائرة كهربائية قصيرة. بدون فتيل, سوف تذوب الأسلاك وتسبب الحريق.
- حل: قم دائمًا بتثبيت منصهر Class-T بالداخل 12 بوصة من الطرف الموجب للبطارية.
خطأ #5: لا توركينينغ اتصالات
- “يد ضيقة” غير مقبول للتوصيلات الكهربائية. قوس اتصالات فضفاضة, ارتفاع درجة الحرارة, وتفشل.
- حل: استخدم مفتاح عزم الدوران على كل العروة والمحطة. تسجيل قيم عزم الدوران.
خطأ #6: التأريض غير السليم
- يمكن للمصفوفات الشمسية بناء شحنة ثابتة وتكون عرضة للصواعق.
- حل: ربط جميع الأجزاء المعدنية (القضبان, إطارات اللوحة) والاتصال بنظام قطب التأريض بالمنزل.
خطأ #7: نسيان 120% قاعدة (مربوط بالشبكة)
- قد يؤدي التحميل الزائد على قضيب توصيل اللوحة الرئيسية إلى خطر نشوب حريق.
- حل: حساب تصنيف بسبار, حجم الكسارة الرئيسية, وحجم الكسارة الشمسية قبل التثبيت.
خطأ #8: سلاسل غير متوازنة
- مع 14 لوحات, لديك الفرصة لتحقيق التوازن المثالي. لا تقم بإنشاء سلاسل غير متساوية.
- حل: احتفظ بالسلسلتين في 7 لوحات لكل منهما نفس الجهد والتيار.
15. متى تتصل بمحترف
في حين أن هذا الدليل مخصص لعشاق الأعمال اليدوية, تتطلب بعض المهام كهربائيين مرخصين:
- تعديلات اللوحة الرئيسية: إذا كنت بحاجة إلى استبدال اللوحة الرئيسية أو نقل الكسارة الرئيسية.
- الصنابير الجانبية العرض: إذا لم تتمكن اللوحة الخاصة بك من استيعاب 120% قاعدة, يتطلب الاتصال من جانب العرض مشاركة المرافق والتركيب الاحترافي.
- ترقية الخدمة: إذا كانت خدمتك الرئيسية صغيرة جدًا (على سبيل المثال, 60خدمة) للتعامل مع الطاقة الشمسية بالإضافة إلى الأحمال الموجودة.
- عمل مقبس عداد المنفعة: أي شيء يتطلب سحب العداد أو تعديل مقبس العداد.
- التفتيش النهائي: تتطلب العديد من الولايات القضائية فنيًا كهربائيًا مرخصًا لسحب التصريح وإجراء التوصيلات النهائية.
16. ملخص مواصفات النظام
| عنصر | مواصفة |
|---|---|
| حجم النظام | 5.4 كيلوواط العاصمة (مع لوحات 385 واط) |
| لوحات | 14× 360 واط - 400 واط أحادي البلورية |
| مساحة السقف مطلوبة | ~250-280 قدم مربع |
| تكوين السلسلة | 2 سلاسل من 7 لوحات (متوازن تماما) |
| سلسلة الجهد | كل سلسلة: ~ 315 فولت التشغيل / ~ 365 فولت كحد أقصى |
| سلك العاصمة (تشغيل المنزل) | 6 سلك AWG الكهروضوئي |
| إخراج العاكس | 5,000واط مستمر @ 240 فولت (يقبل 5.4 كيلو واط تيار مستمر) |
| حجم قواطع التيار المتردد | 30قطب مزدوج |
| سلك التيار المتردد | 10 الفريق العامل المخصص (8 AWG للمسافات الطويلة) |
| بطارية (خارج الشبكة) | 48V @ 200 أمبير كحد أدنى (10كيلوواط ساعة) |
| كابل البطارية (خارج الشبكة) | 2/0 الفريق العامل المخصص أو 4/0 الفريق العامل المخصص |
| فيوز البطارية (خارج الشبكة) | فئة-T, 200أ-250أ |
| الإنتاج اليومي | 22-32 كيلوواط ساعة (يختلف حسب الموقع) |
17. اختتام
استخدام نظام شمسي بقدرة 5 كيلو وات 14 توفر اللوحات التوازن المثالي بين إنتاج الطاقة والتماثل الكهربائي. مع سلسلتين متطابقتين من 7 لوحات لكل منهما, تحصل عليه:
- الأسلاك أبسط بمكونات متطابقة
- أداء أفضل مع إنتاج الطاقة المتوازن
- استكشاف الأخطاء وإصلاحها أسهل عندما تتصرف كلا السلسلتين بشكل متماثل
- المزيد من القوة (5.4كيلوواط مقابل 5.0 كيلوواط) بأقل تكلفة إضافية
- التوسع المستقبلي المحتملة عن طريق إضافة أزواج من اللوحات
عندما يتم تركيبها بشكل صحيح, سيوفر هذا النظام الطاقة النظيفة ل 25+ سنوات, تقليل أو إلغاء فواتير الكهرباء, وزيادة استقلال الطاقة الخاص بك.
تذكير السلامة النهائي:
-
الحصول على جميع التصاريح المطلوبة قبل البدء
-
اعمل مع شريك، وليس بمفردك أبدًا على السطح أو مع الجهد العالي
-
استخدم إجراءات القفل/العلامة عند العمل على اللوحات الكهربائية
-
عندما تكون في شك, استشارة كهربائي مرخص.