
Аутор: Денис Руест, П.Енг/ИПКДФ
Ниво вештине: Адванцед ДИИ (Потребно искуство у електротехници)
Напон: 120/240В Сплит-Пхасе
Величина система: 5кВ (кило Ваттс)
1. Увод: Разумевање вашег циља
Соларни систем од 5 кВ је значајна инвестиција која може напајати већину куће средње величине. Коришћење14 панели (више него 13) ствара уравнотежене конфигурације низова—два једнака низа 7 сваки панели - поједностављивање ожичења, побољшање електричне равнотеже, и олакшава решавање проблема.
Пре куповине делова, морате одлучити: Мрежа везана или ван мреже?
- Грид-Тиед: Остајете повезани са услужним програмом. Можете продати струју назад (Нет Метеринг) али систем се гаси током нестанка мреже ради безбедности (Анти-Исландинг). Систем везан за мрежу од 5 кВ обично производи 20-25 кВх дневно, довољно да надокнади просечну употребу у домаћинству.
- Офф-Грид: Потпуно сте независни од услужног програма. Захтева велику батерију (48В @ 200 Ах или више). Систем ради 24/7 без обзира на мрежу. Систем ван мреже од 5 кВ може да покреће фрижидере, светла, електроника, па чак и мали клима уређаји или бунарске пумпе у циклусима.
Одрицање: Рад са струјом је опасан. Консултујте лиценцираног електричара за коначне везе. Дозволе су потребне од стране ваше локалне јурисдикције за системе ове величине. Овај чланак је у информативне сврхе и не замењује лиценцираног стручњака.
2. Зашто 14 Панели? Предност парних бројева
Коришћење 14 панели (две жице од 7) нуди значајне предности над 13 панели:
| Феатуре | 13 Панели (7+6) | 14 Панели (7+7) |
|---|---|---|
| Стринг Баланце | Неједнаке жице | Савршено избалансиран |
| Волтаге Матцхинг | Различити напони жице | Идентични напони жице |
| Цомбинер Бок | Захтева другачије спајање | Идентично спајање за обе жице |
| Перформансе | Једна жица производи мање | Једнака производња од оба |
| Проширивост | Неугодна конфигурација | Лако касније додати парове |
| Тотал Повер | ~5.0кВ (са панелима од 385В) | ~5.4кВ (са панелима од 385В) |
С 14 к 385В панели, добијате5,390У—леп бафер изнад 5кВ који помаже у облачним данима без преоптерећења већине претварача од 5кВ (који обично прихватају до 6.000 В ДЦ улаза).
3. Алати & Контролна листа материјала
Алати су потребни:
- Бушилица & Импацт Дривер са хексадецималним битовима
- Соцкет Сет & Кључеви (метричке и стандардне)
- Скидачи/резачи жице (10 АВГ то 2/0 АВГ способан)
- Дигитални мултиметар са могућношћу једносмерног напона до 600В
- ПВ (Солар) Заштитне рукавице (изоловани)
- Торкуе Вренцх (инч-фунтима и стопа-фунтима)
- Студ Финдер (електронски)
- Цхалк Лине
- Цондуит Бендер (1/2″ и 3/4″)
- Фисх Тапе
- Алат за пресовање кабловских папучица (хидраулика препоручује се за каблове акумулатора)
Материјали за систем од 5кВ (14 Панели):
Солар Арраи:
- Соларни панели: 14к 360В-400В панели (укупно 5,0-5,6кВ). Изаберите високоефикасне монокристалне панеле да бисте минимизирали кровни простор.
- Рацкинг Систем: Алуминијумске шине, Л-стопе, средње стеге, крајње стеге, трепери (ИронРидге, Унирац, или СнапНрацк). Уверите се да је дозвољено оптерећење ветром/снегом у вашем подручју.
- Приземљење: Паушице за уземљење, ВЕЕБ подлошке, или бакарне жице.
ДЦ Елецтрицал:
- Цомбинер Бок: Кућиште отпорно на временске услове са могућношћу 2 жице.
- Стринг Фусес: 15Осигурачи или прекидачи за сваки низ (2 потребан, идентичне оцене).
- ПВ Вире: 10 АВГ или 8 АВГ за интерконекције панела, 6 АВГ за хоме рун.
- ДЦ Дисцоннецт: 30Сигурносни прекидач А или 60А на отвореном.
Инвертер:
- Опција везана за мрежу: 5кВ Стринг Инвертер (СМА, СоларЕдге, Фроније) или 5кВ микроинвертера (Енпхасе ИК8+). Уверите се да максимални ДЦ улаз одговара ~5,4кВ.
- Опција ван мреже: 5кВ Сплит-Пхасе Алл-ин-Оне јединица са уграђеним контролером пуњења (Гроватт СПФ 5000 Ово је, МПП Солар ЛВКС6048, Вицтрон МултиПлус-ИИ). Мора прихватити 48В ДЦ улаз.
АЦ Елецтрицал:
- Панел прекидача наизменичне струје: Главни панел или подпанел.
- Доубле-Поле Бреакер: 30A for solar backfeed.
- THHN Wire: 10 AWG copper (color-coded: црн, црвен, white, зелен).
- AC Disconnect: Outdoor-rated safety switch (if required by code).
Off-Grid Only:
- Battery Bank: 48V Lithium Iron Phosphate (LiFePO4) батерије. Minimum 100Ah (5кВх), Recommended 200Ah (10кВх) for overnight loads. Examples: EG4 LL, Trophy Battery, Pylontech.
- Battery Cables: 2/0 АВГ или 4/0 AWG welding cable with lugs.
- Class-T Fuse: 250A or 300A with holder.
- Busbars: Heavy-duty copper busbars for battery connections.
- Battery Rack: Server rack or shelf system.
Consumables:
- Wire nuts / Wago connectors
- Cable ties (UV-resistant for outdoors)
- Conduit (Schedule 40 PVC or EMT)
- Penetration sealant (roofing caulk)
- Electrical tape
- Label maker / UV-resistant labels
4. System Design & Layout (The Paperwork Phase)
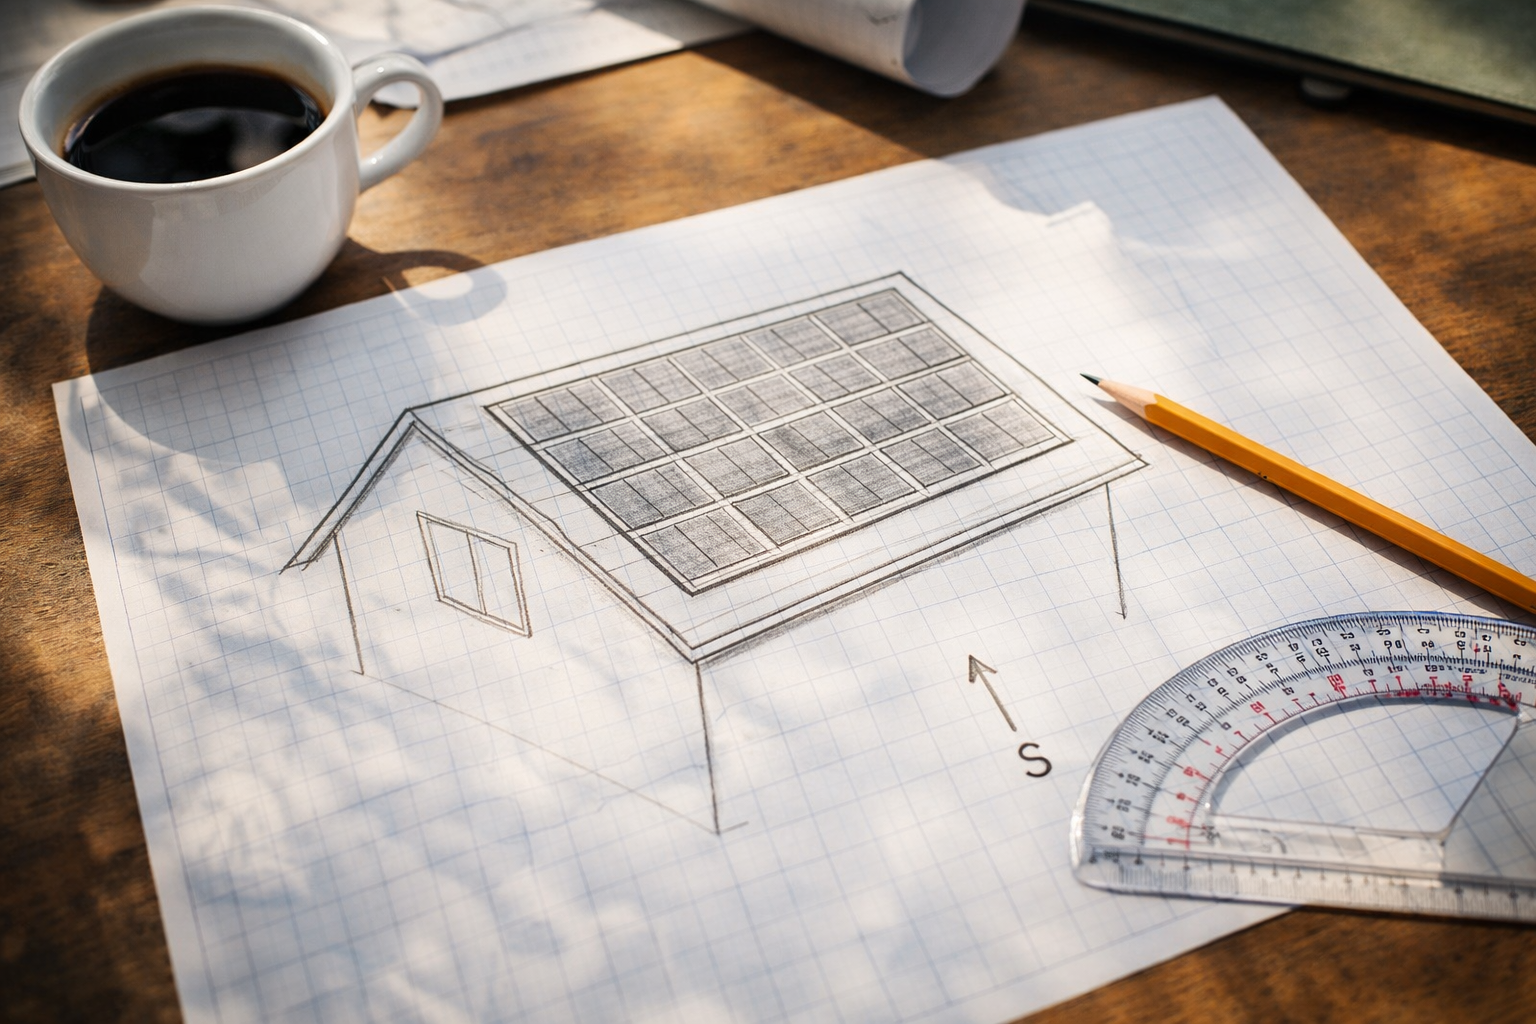
[Image: A sketch on graph paper of a roof with 14 panels arranged in two neat rows of 7, south arrow, and string diagram]
Пре подизања једне плоче, морате завршити дизајн на папиру. Ово је потребно за дозволе и осигурава да ваше компоненте безбедно раде заједно.
Корак 4.1: Процена крова
- Оријентација: Окренут према југу је најбоље на северној хемисфери. Југоисток или југозапад ће изгубити 10-15% производње.
- Питцх: Већина кровова ради, али стрмим теренима (већи од 45°) захтевају посебну сигурносну опрему.
- Стање: Уверите се да ваш кров има најмање 10 преостале године живота. Поновно покривање крова након соларне инсталације је скупо.
- Препреке: Измерите растојање од димњака, вентилациони отвори, и кровни прозори. Вама треба 18-36 инча размака око низа за приступ ватри (проверите локалне кодове).
- Layout: С 14 панели, можете их распоредити у два реда 7 (пејзажна оријентација) или седам редова 2 (портретна оријентација). Два реда 7 је најчешћи.
Корак 4.2: Прорачун величине низа (Перфецт Баланце)
С 14 панели, креирате два идентична низа 7 панели сваки.
- Панел Волтаге: Већина модерних панела од 400В има Воц (напон отвореног кола) око 40-45В.
- Стринг А: 7 панели к 45В = 315В (оперативни) / 365У (макс. хладна темп)
- Стринг Б: 7 панели к 45В = 315В (оперативни) / 365У (макс. хладна темп)
- Тотал Повер: Обе жице се комбинују паралелно у кутији за комбиновање, производећи идентичан напон и уравнотежену струју.
Критички: Користите калкулатор величине жица (доступно на веб локацијама произвођача претварача) са рекордно ниском температуром ваше локације. Хладноћа повећава напон и може уништити ваш претварач ако није правилно израчунат. Са жицама од 7 панела, имаћете доста сигурносне маргине испод типичног 600В мак инвертерског улаза.
Корак 4.3: Процена производње
Систем од 5,4 кВ (14 к 385В) у области са 5 генерисаће се вршни сунчани сати:
- Даили: 5.4кВ к 5 сати к 0.8 (системски губици) = 21.6 кВх/дан
- Месечно: 21.6 кВх к 30 = 648 кВх/месец
- Годишње: Зависи од сезоне, типично 7,000-9,000 кВх/год
Ово покрива 60-100% просечне употребе куће у зависности од ефикасности.
Корак 4.4: Дозвољавам
Visit your local building department with:
- Site plan showing roof dimensions
- Panel layout diagram (14 панели јасно приказани)
- Електрични једнолинијски дијаграм
- Спецификације опреме
- Структурни прорачуни (ако је потребно)
Сачекајте одобрење пре куповине опреме или почетка инсталације.
5. Инсталирајте сталак (Монтажни хардвер)
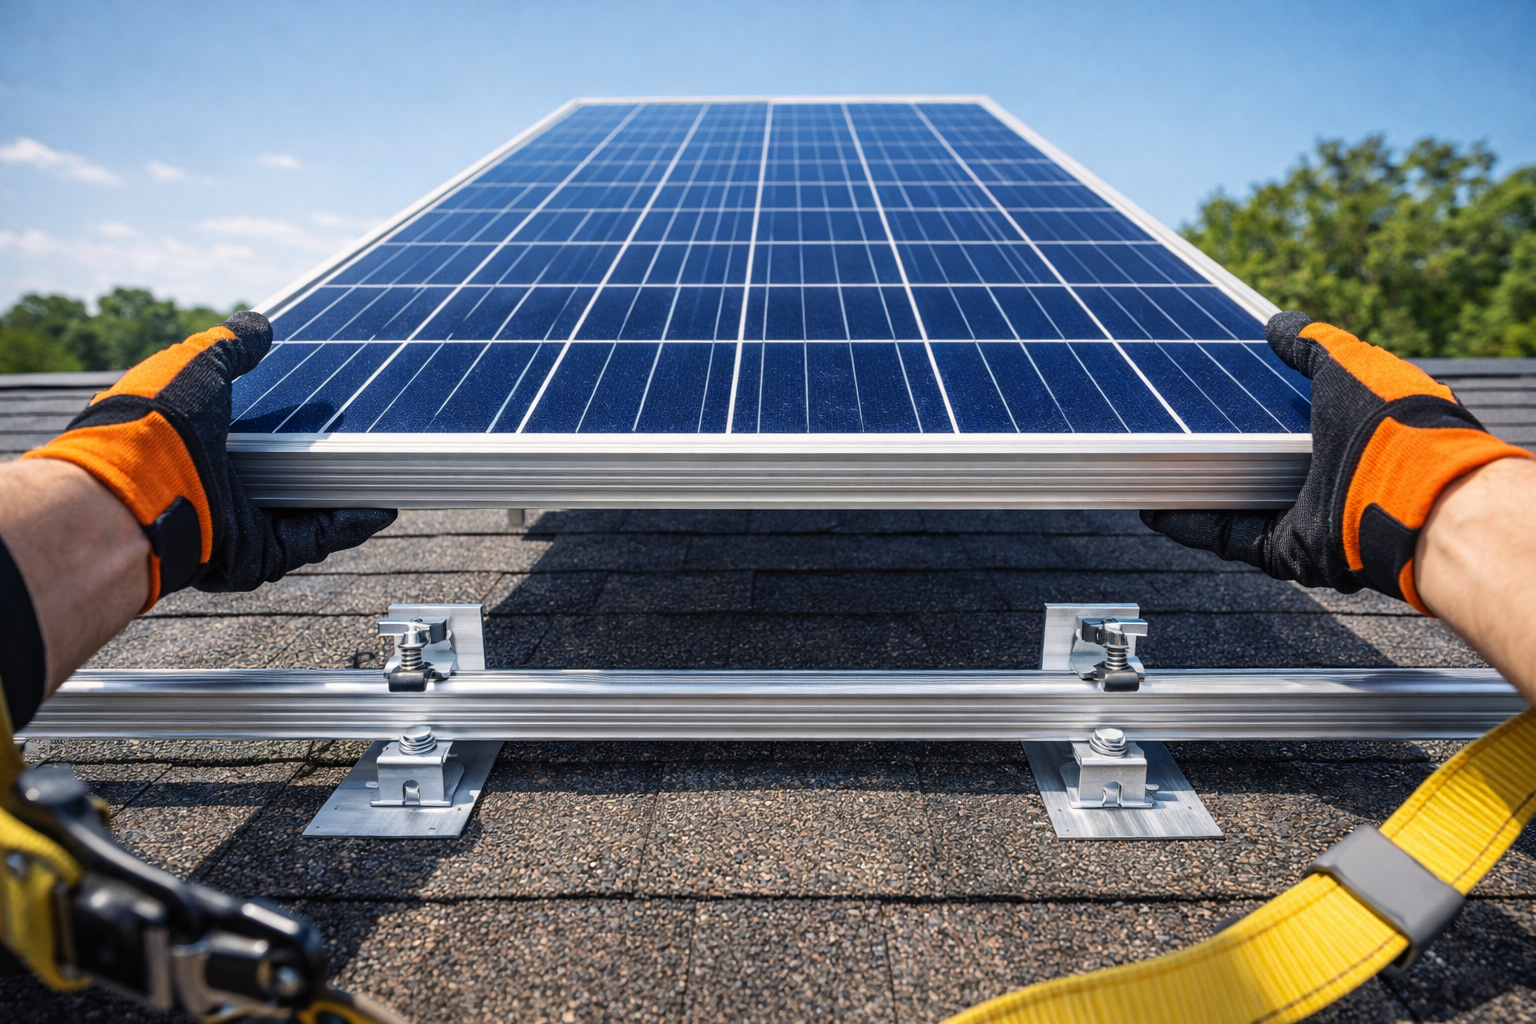
[Image: Опшив се поставља испод подигнуте шиндре са завртњем убоденим у рог, сигурносни појасеви видљиви]
Систем регала је основа вашег соларног низа. Систем од 5кВ са 14 панели теже приближно 650-850 фунти и мора да издржи силе подизања ветра.
Корак 5.1: Пронађите Рафтерс
- Употријебите електронски налазник да бисте лоцирали рогове. Означите их линијама креде преко крова.
- Стандардни размак рогова је 24″ на центру. Ако је ваш размак већи, потребно вам је структурно ојачање.
- Јасно означите све локације рогова - ово ће вам требати за сваку тачку монтаже.
- За 14 панели у два реда, биће вам потребне тачке за монтажу на сваком раскрсници рогова са шинама.
Корак 5.2: Инсталирајте Фласхинг
- Пажљиво подигните шиндре тамо где ће носач ићи. Користите равну шипку да бисте избегли пуцање шиндре.
- Убаците алуминијумски светлуцав потпуно испод шиндре, са горњом ивицом испод курса изнад.
- Опшив треба да има уграђени заптивач или испод њега треба нанети кровну заптивку.
Корак 5.3: Причврстите Л-ноге
- Избушите пилот рупу кроз опшив и у центар рогова. Користите граничник на бургији да спречите предубоко бушење.
- Уметните вијак за кашњење (обично 3/8″ к 4″ нерђајући челик) са уграђеном машином за прање.
- Чврсто затегните, али не претерујте. Циљ је стиснути бљесак без деформисања.
- Запечатите главу вијка додатним кровним заптивачем.
Корак 5.4: Инсталирајте Раилс
- Причврстите алуминијумске попречне шине на Л-стопе помоћу Т-завртња и капица.
- За 14 панели у два реда 7, требаће вам две хоризонталне шине које пролазе целом ширином низа.
- Уверите се да су шине савршено равне са стране на страну и напред-назад. Користите ниво од 4 стопе.
- Спојите делове шина помоћу унутрашњих спојева ако је ваша стаза дужа од доступних дужина шина. Уверите се да су спојеви чврсти и равни.
Безбедносни савет: Увек носите појас са кровним сидром. Пад са крова може бити фаталан.
6. Монтирајте соларне панеле
Корак 6.1: Стаге Панелс Сафели
- Подигните панеле на кров помоћу подизача панела, кровне куке, или их пажљиво предати.
- С 14 панели, раде систематски - сценски панели за један по ред.
- Поставите панеле лицем надоле на јастучиће од пене да бисте заштитили стакло док припремате ожичење.
Корак 6.2: Пре-Вире (Опционо, али препоручено)
- Ако је доступно, причврстите МЦ4 продужне каблове на разводне кутије панела пре монтаже.
- This is easier on the ground or with panels flipped over than when they’re mounted.
- За 14 панели, you’ll have 14 positive and 14 negative leads to organize.
Корак 6.3: Position Panels
- Start at one corner of the array. Place the first panel onto the rails.
- Work across the row, then start the second row.
- Panels should sit on the rails with the frame resting on the clamps.
Корак 6.4: Secure with Clamps
- Mid-Clamps: Used between panels. They clamp the frames of two adjacent panels to the rail. You’ll need approximately 22 средње стеге.
- End-Clamps: Used at the ends of each rail to secure the last panel. You’ll need 4 end-clamps per rail (8 total).
- Torque all clamps to manufacturer specifications (типично 15-20 ft-lbs). Under-torquing risks panels blowing away; over-torquing can crack the frames.
Корак 6.5: Ground the Array
- Use WEEB (Washer Electrical Equipment Bond) clips that pierce the anodized coating on rails and panel frames.
- Alternatively, run a continuous bare copper ground wire bonded to each rail with listed grounding lugs.
- Connect the array ground to the home’s grounding electrode system.
7. Electrical Wiring (DC Side)
[Image: Close-up of MC4 connectors clicking together, then a diagram showing 2 identical strings of 7 panels merging in a combiner box]
С 14 панели, you create two perfectly matched strings of 7 панели сваки.
Корак 7.1: Configure the Strings
- Стринг А (7 панели): Connect positive (+) of panel 1 to negative (-) of panel 2, and so on through all 7 панели. The end will have one free positive and one free negative.
- Стринг Б (7 панели): Repeat the process for the remaining 7 панели, following the same pattern.
Корак 7.2: Voltage Check
- Before connecting to the inverter, measure each string voltage with a multimeter on a sunny day.
- String A should read approximately 280-320V DC (depending on panel specs and sunlight).
- String B should read identical voltage to String A (within 1-2V).
- Record these values for your records. Matched voltages confirm proper wiring.
Корак 7.3: Run Wires to Combiner Box
- Run the positive and negative wires from each string down to the combiner box location (usually near the array edge or on the wall below).
- Use PV wire rated for outdoor exposure and sunlight.
- Label each wire pair clearly: “String A +”, “String A -“, “String B +”, “String B -“.
Корак 7.4: Install Combiner Box
- Mount the weatherproof combiner box on the wall near the array or on the roof edge.
- Inside the box, connect each string positive to a 15A fuse or breaker (identical for both strings).
- Connect each string negative to a common negative busbar.
- The combined output goes to a single positive and negative wire (the “home run”).
Корак 7.5: Run Home Run to DC Disconnect
- From the combiner box, run 6 AWG PV wire (positive and negative) down to the DC disconnect switch mounted outside near the inverter.
- Use conduit for protection where wires are exposed.
- Label this wire “PV Array Output 5.4kW” at both ends.
8. Mount the Inverter & AC Panel
Корак 8.1: Select Location
- Indoors (garage/basement) is ideal for inverter longevity.
- Outdoors requires a NEMA 4X rated inverter.
- Location must be close to the main electrical panel to minimize AC wire runs.
- For off-grid, location must be close to the battery bank (battery cables must be short).
Корак 8.2: Install Backboard
- Mount a 4′ к 4′ sheet of 3/4″ plywood on the wall. Paint it with fire-retardant paint if required by code.
- This provides a solid mounting surface and organizes equipment.
Корак 8.3: Mount Inverter
- Inverter weight: 5kW units weigh 50-100 pounds. Use lag bolts into studs.
- Maintain manufacturer-specified clearance (типично 6-12 inches on all sides) for airflow.
- Ensure the inverter is level.
Корак 8.4: Mount AC Panel
- If using a sub-panel for critical loads (off-grid), mount it next to the inverter.
- If backfeeding the main panel (grid-tied), ensure the main panel has an open double-pole breaker slot.
Корак 8.5: Install Disconnects
- Mount the DC disconnect (between combiner box and inverter) within sight of the inverter.
- Mount the AC disconnect (between inverter and main panel) if required by local code.
9. Battery Bank Wiring (Off-Grid Only)
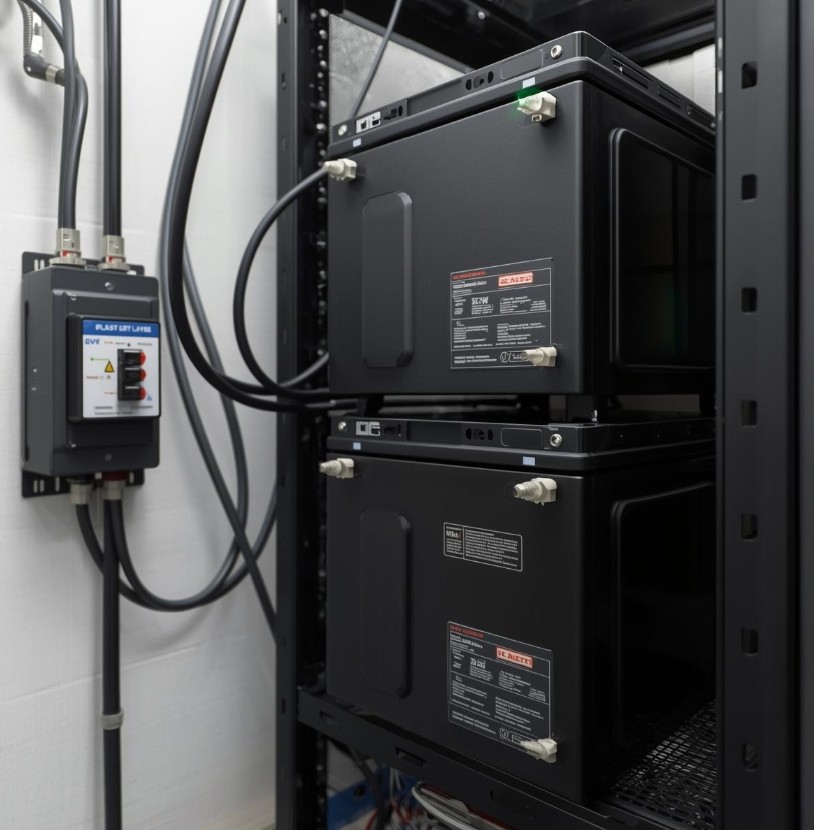
[Image: A rack of blue lithium batteries wired in series-parallel to create 48V, with heavy cables and a Class-T fuse]
A 5kW inverter at 48V draws104 Amps при пуном оптерећењу. This requires serious cabling and safety protection.
Корак 9.1: Select Battery Configuration
- 48V System: Most 5kW off-grid inverters require a 48V battery bank.
- Capacity: For a 5kW load to run overnight (say 10 hours at partial load), you need at least 10kWh of storage.
- Typical Setup with 14 Панели: With 5.4kW of solar, you can charge a substantial battery bank. Recommended: 48V @ 200Ah (10кВх) minimum, 48V @ 300Ah (15кВх) ideal.
- Configuration Options:
- 4x 12V 200Ah batteries in series = 48V @ 200Ah (10кВх)
- 8x 12V 200Ah in series-parallel = 48V @ 400Ah (20кВх)
- 3x 48V server rack batteries in parallel = 48V @ 300Ah (15кВх)
Корак 9.2: Position Batteries
- Place batteries on a rack or shelf. Never place directly on concrete floor (cold can damage them).
- Ensure adequate ventilation—batteries can off-gas (even lithium in fault conditions) and generate heat.
Корак 9.3: Wire Batteries
- Use 2/0 AWG или 4/0 AWG welding cable for all battery interconnections.
- Crimp heavy-duty lugs onto cables using a hydraulic crimper.
- For series connections: Connect positive of battery 1 to negative of battery 2, итд.
- For parallel strings: Connect all positives together on a busbar, all negatives together on a busbar.
Корак 9.4: Install Class-T Fuse
- CRITICAL: Install a Class-T fuse within 12 inches of the battery positive terminal.
- Fuse sizing: Inverter max continuous current x 1.25 = fuse size. For 104A x 1.25 = 130A minimum. Most 5kW inverters use 200A-250A fuses to handle surge loads.
- The Class-T fuse protects against short circuits—batteries can deliver thousands of amps in a fault, causing fire or explosion.
Корак 9.5: Connect to Inverter
- Run the positive cable from the fuse to the inverter battery positive terminal.
- Run the negative cable directly from the battery negative busbar to the inverter battery negative terminal.
- Torque all connections to manufacturer specifications.
Корак 9.6: Install Battery Monitor (Необавезан)
- Install a shunt-based battery monitor (Victron BMV-712 or similar) to track state of charge accurately.
- This is essential for off-grid living to know how much capacity remains.
10. AC Wiring (Грид-Тиед & Офф-Грид)
[Image: An electrician wiring a 30A double-pole breaker in a main electrical panel, labeled “Солар”]
Корак 10.1: Understand the Math
5,400 Watts at 240 Volts =22.5 Amps continuous (at full 5.4kW output).
National Electrical Code requires circuits to be sized at 125% of continuous load:
- 22.5A x 1.25 = 28.1A
- Дакле, you need a 30A double-pole breaker (next standard size above 28.1A).
Корак 10.2: Wire Gauge Selection
- For a 30A breaker, use 10 AWG copper wire (minimum).
- If the run from inverter to main panel exceeds 100 feet, upgrade to 8 AWG to prevent voltage drop.
- Use color-coded THHN wire: Black (L1), Red (L2), White (Neutral), Green (Основа).
Корак 10.3: Off-Grid Connection
- Run L1, L2, Neutral, and Ground from the inverter output to a dedicated “Critical Loads” sub-panel.
- In the sub-panel, install standard 15A and 20A breakers for circuits you want backed up (refrigerator, светла, Интернет, итд).
- Transfer those circuits from the main panel to the sub-panel.
Корак 10.4: Grid-Tied Connection (Backfeeding)
- Run L1, L2, Neutral, and Ground from the inverter output to the main service panel.
- Install the 30A double-pole breaker in an open slot at the opposite end of the panel from the main breaker (this helps with the 120% rule).
- Connect L1 to one terminal of the breaker, L2 to the other terminal. Connect Neutral to the neutral busbar, Ground to the ground busbar.
- Label the breaker “SOLAR 5.4kW” clearly so future electricians know it’s backfed.
Корак 10.5: The 120% Rule (Critical for Grid-Tied)
- Your main panel busbar has a rating (usually 100A, 125A, or 200A).
- The sum of the main breaker and the solar backfeed breaker cannot exceed 120% of the busbar rating.
- Example: 125A busbar x 1.2 = 150A maximum. 100A main + 30A solar = 130A, which is acceptable.
- If your panel can’t accommodate this, you need a “Supply Side Tap” (connection before the main breaker), which requires an electrician.
11. Final Connections & Power-On Sequence
[Image: A person using a multimeter to check voltage at the DC disconnect before turning it on]
Корак 11.1: Pre-Power Checks
- Visual Inspection: Check every wire connection. Look for loose strands, nicked insulation, or incorrect routing.
- Polarity Check: Verify positive goes to positive, negative to negative everywhere. Reversed polarity on a charge controller or inverter will destroy it instantly.
- Torque Check: Ensure all terminal screws are torqued to spec. Loose connections cause arcing and fires.
- Voltage Check (ДЦ): Measure voltage at the DC disconnect. Both strings should show identical voltage (within 2V).
- Voltage Check (AC): Ensure main panel is energized and voltage is 120/240V ±5%.
Корак 11.2: Turn-On Sequence (Грид-Тиед)
- Turn on the AC breaker from the main panel to the inverter (grid power).
- Wait for inverter display to power up and show grid parameters.
- Turn on the DC disconnect from the solar array.
- The inverter should detect solar power, synchronize with the grid (takes 2-5 записник), and begin exporting.
- Verify display shows “Producing” или “Грид-Тиед” mode with positive wattage. С 14 панели, you should see 4.5-5.4kW near solar noon.
Корак 11.3: Turn-On Sequence (Офф-Грид)
- Ensure all AC loads are turned off.
- Turn on the DC battery breaker or disconnect first.
- Inverter screen should light up. Verify battery voltage reads correctly.
- Turn on the solar DC disconnect.
- The charge controller should activate and begin charging batteries (Bulk mode). Voltage should rise.
- Turn on the inverter AC output breaker.
- Test by turning on a small load (like a light). The inverter should power it.
- Gradually add larger loads to test system response.
Корак 11.4: Observe Initial Operation
- Let the system run for 30 записник. Watch for:
- Unusual noises (buzzing, arcing)
- Overheating components
- Error codes on the display
- Inverter fans cycling properly
- With balanced strings, both should contribute equally—check inverter display for per-string data if available.
12. Праћење & Performance Testing
[Image: A smartphone screenshot showing a solar monitoring app with 5.4kW production and 26.5 kWh daily total]
Корак 12.1: Connect Monitoring
- Most modern inverters have Wi-Fi or Ethernet connectivity.
- Download the manufacturer’s app and create an account.
- Register the inverter using its serial number.
- Connect to your home network and verify data transmission.
Корак 12.2: Verify Production
- On a clear day near solar noon, your 5.4kW system should produce 4.6кВ – 5.2кВ depending on:
- Panel temperature (hot panels produce less)
- Angle relative to sun
- Atmospheric conditions
- If production is significantly lower, check for shading issues or wiring problems.
- Compare the two strings—they should show nearly identical output.
Корак 12.3: Daily/Annual Expectations
- Даили: 22-32 kWh depending on season
- Месечно: 660-960 кВх
- Annual: 8,000-11,000 кВх (varies by location)
Корак 12.4: Off-Grid Specific Monitoring
- Track battery state of charge daily.
- Note what time batteries reach full charge (indicates array sizing adequacy).
- Note what time batteries reach low charge (indicates if more capacity needed).
- Adjust usage habits if needed to stretch through the night.
13. Labeling & Документација
[Image: A clean electrical panel with professionally printed labels on every breaker and wire]
Code requires specific labeling for safety:
Required Labels:
- ДЦ Дисцоннецт: “PHOTOVOLTAIC SYSTEM DISCONNECT – 5.4kW DC”
- AC Disconnect: “SOLAR AC DISCONNECT – 5.4кВ”
- Backfed Breaker: “SOLAR 5.4kW” (on the breaker itself)
- Main Panel: Warning label stating “THIS EQUIPMENT SUPPLIED BY MULTIPLE SOURCES – SOLAR 5.4kW” (if backfeeding)
- Инвертер: Manufacturer label with ratings visible
- Цомбинер Бок: “STRING A (7 PANELS)” и “STRING B (7 PANELS)” on each fuse
- All Conductors: Identify at each termination point with voltage and source
Documentation to Keep:
- Permit approval documents
- Equipment manuals
- One-line diagram with actual wire lengths noted
- Warranty information
- Monitoring login credentials
- Emergency shutdown procedure (post near main panel)
- Panel layout diagram showing which panels belong to which string
14. Common Mistakes to Avoid
Mistake #1: Undersizing Wire
- A 5.4kW system pulls serious current. Коришћење 14 AWG wire for battery connections or long DC runs causes voltage drop and fire risk.
- Решење: Always use voltage drop calculators and follow NEC ampacity tables. С 14 панели, your home run current is higher—use 6 AWG minimum.
Mistake #2: Ignoring Temperature Effects on Voltage
- Cold temperatures increase panel voltage. Panels rated 40V at 25°C can reach 48V at -10°C.
- Решење: Calculate string voltage using the record low temperature for your area. Са жицама од 7 панела, you have good safety margin.
Mistake #3: Mixing Panel Types in Strings
- Panels in series must have the same amperage. Panels in parallel must have the same voltage.
- Решење: Buy identical panels for the entire 14-panel array. Don’t mix old and new.
Mistake #4: Skipping the Battery Fuse (Офф-Грид)
- Batteries can deliver thousands of amps in a short circuit. Without a fuse, wires will melt and cause fire.
- Решење: Always install a Class-T fuse within 12 inches of the battery positive terminal.
Mistake #5: Not Torquing Connections
- “Hand tight” is not acceptable for electrical connections. Loose connections arc, overheat, and fail.
- Решење: Use a torque wrench on every lug and terminal. Record torque values.
Mistake #6: Improper Grounding
- Solar arrays can build up static charge and are vulnerable to lightning.
- Решење: Bond all metal parts (rails, panel frames) and connect to the home’s grounding electrode system.
Mistake #7: Forgetting the 120% Rule (Грид-Тиед)
- Overloading the main panel busbar is a fire hazard.
- Решење: Calculate busbar rating, main breaker size, and solar breaker size before installing.
Mistake #8: Unbalanced Strings
- С 14 панели, you have the opportunity for perfect balance. Don’t create uneven strings.
- Решење: Keep both strings at 7 panels each for identical voltage and current.
15. When to Call a Professional
While this guide is for DIY enthusiasts, certain tasks require licensed electricians:
- Main Panel Modifications: If you need to replace the main panel or move the main breaker.
- Supply Side Taps: If your panel can’t accommodate the 120% rule, a supply-side connection requires utility involvement and professional installation.
- Service Upgrade: If your main service is too small (на пример, 60A service) to handle solar plus existing loads.
- Utility Meter Socket Work: Anything that requires pulling the meter or modifying the meter socket.
- Final Inspection: Many jurisdictions require a licensed electrician to pull the permit and perform final connections.
16. System Specifications Summary
| Саставни | Specification |
|---|---|
| Величина система | 5.4 kW DC (са панелима од 385В) |
| Панели | 14x 360W-400W monocrystalline |
| Roof Space Required | ~250-280 sq ft |
| String Configuration | 2 strings of 7 панели (perfectly balanced) |
| String Voltage | Each string: ~315V operating / ~365V max |
| DC Wire (Home Run) | 6 AWG PV wire |
| Inverter Output | 5,000W continuous @ 240V (accepts 5.4kW DC) |
| AC Breaker Size | 30A double-pole |
| AC Wire | 10 AWG (8 AWG for long runs) |
| Battery (Офф-Грид) | 48V @ 200Ah minimum (10кВх) |
| Battery Cable (Офф-Грид) | 2/0 АВГ или 4/0 AWG |
| Battery Fuse (Офф-Грид) | Class-T, 200A-250A |
| Daily Production | 22-32 кВх (varies by location) |
17. Закључак
A 5kW solar system using 14 panels offers the perfect balance of power output and electrical symmetry. With two identical strings of 7 панели сваки, добијате:
- Simpler wiring with identical components
- Better performance with balanced power production
- Easier troubleshooting when both strings behave identically
- More power (5.4kW vs 5.0kW) for minimal additional cost
- Future expansion potential by adding pairs of panels
When properly installed, this system will provide clean energy for 25+ године, reduce or eliminate electric bills, and increase your energy independence.
Final Safety Reminder:
-
Obtain all required permits before starting
-
Work with a partner—never alone on a roof or with high voltage
-
Use lockout/tagout procedures when working on electrical panels
-
When in doubt, consult a licensed electricien.